Mazda CX-5 Service & Repair Manual: Front Fender Panel Removal/Installation
1. Disconnect the negative battery cable..
2. Remove the following parts:
a. Front bumper.
b. Front combination light.
c. Front bumper slider.
d. Front over fender.
3. Remove bolts A and fasteners B.
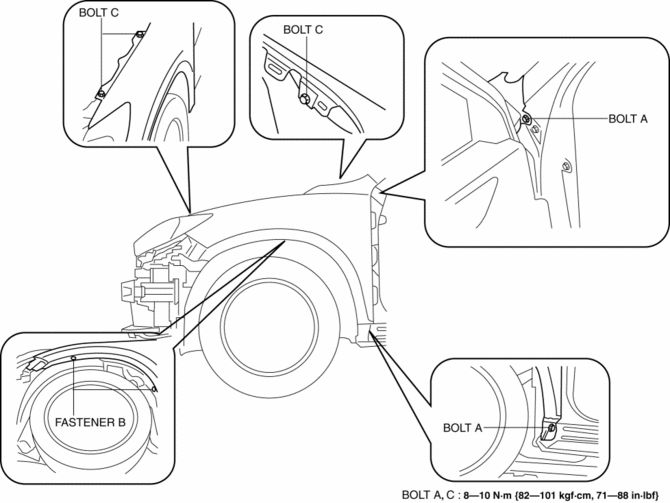
4. Remove bolts C.
5. Remove the front fender panel.
6. Install in the reverse order of removal.
7. Adjust the headlight aiming..
 Front Fender Junction Removal [Panel Replacement]
Symbol Mark
Removal Procedure
1. Drill the 3 locations shown in the figure.
2. Remove the front fender junction. ...
 Front Over Fender Removal/Installation
1. Remove fastener A.
2. Pull the front over fender lower in the direction of the arrow (1) while removing
hook B and pin C.
3. Remove fasteners D.
4. Pull the front over fender upper ...
Other materials:
Hood Latch And Release Lever Removal/Installation
Hood Latch
1. Open the hood.
2. Disconnect the negative battery cable..
3. Remove the front bumper..
4. Insert a tape-wrapped flathead screwdriver into the position shown in the
figure.
5. Move the tape-wrapped flathead screwdriver in the direction of arrow (1) shown
in the figure t ...
Charging System [Skyactiv G 2.0]
Outline
Regulator-less generator (built-in power transistor) has been adopted.
A generator using two delta connection type stator coils has been adopted.
Structural View
Structure
Consists of the following parts:
Battery
(See B ...
Engine Coolant Temperature (ECT) Sensor Inspection
Resistance Inspection
WARNING:
When the engine is hot, it can badly burn. Turn off the engine and wait until
it is cool before removing the ECT sensor.
ECT Sensor No.1
1. Remove the ECT sensor No.1..
2. Place the ECT sensor No.1 in water with a thermometer, and heat the water
...
