Mazda CX-5 Service & Repair Manual: Engine Coolant Leakage Inspection
WARNING:
-
Never remove the cooling system cap or loosen the radiator drain plug while the engine is running, or when the engine and radiator are hot. Scalding engine coolant and steam may shoot out and cause serious injury. It may also damage the engine and cooling system.
-
Turn off the engine and wait until it is cool. Even then, be very careful when removing the cap. Wrap a thick cloth around it and slowly turn it counterclockwise to the first stop. Step back while the pressure escapes.
-
When you are sure all the pressure is gone, press down on the cap using the cloth, turn it, and remove it.
1. Inspect the engine coolant level..
2. Remove the cooling system cap.
3. Install the radiator cap tester to the radiator filler neck.
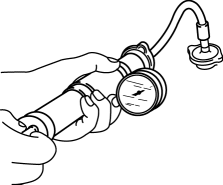
4. Apply pressure using the radiator cap tester.
CAUTION:
-
Applying more than 122.6 kPa {1.250 kgf/cm2, 17.78 psi} can damage the hoses, fittings, and other components, and cause leakage.
-
Engine coolant leakage inspection pressure
-
122.6 kPa {1.250 kgf/cm2, 17.78 psi} [1 min]
5. When pressurizing the cooling system, verify that the pressure is maintained.
-
If the gauge needle drops, it may indicate water leakage. Repair or replace the applicable part.
 Electrical Fan Control
Outline
Through cooling of the radiator and condenser by operation of the cooling
fan according to vehicle conditions, engine reliability and cooling performance
have been improved.
...
 Engine Coolant Level Inspection
WARNING:
Never remove the cooling system cap or loosen the radiator drain plug while
the engine is running, or when the engine and radiator are hot. Scalding engine
coolant and steam may ...
Other materials:
Money-Saving Suggestions
How you operate your Mazda determines how far it will travel on a tank of fuel.
Use these suggestions to help save money on fuel and repairs.
• Avoid long warm-ups. Once the engine
runs smoothly, begin driving.
• Avoid fast starts.
• Keep the engine tuned. Follow the maintenance
sched ...
Tachometer
Purpose
The tachometer notifies the driver of the engine speed.
Function
The instrument cluster controls the tachometer needle based on the engine
speed signal from the PCM and displays the engine speed per minute.
Construction
An analog needle display tachometer ...
Solar Radiation Sensor Inspection [Full Auto Air Conditioner]
1. Shine a fluorescent light or expose the solar radiation sensor to natural
sunlight.
2. Connect the positive (+) lead to terminals B, C and negative (-) lead to terminal
A of the solar radiation sensor, and verify that the voltage value is output.
If the voltage is 0 V, replace ...
