
Mazda CX-5 Service & Repair Manual: Electrical Fan Control
Outline
-
Through cooling of the radiator and condenser by operation of the cooling fan according to vehicle conditions, engine reliability and cooling performance have been improved.
Block Diagram
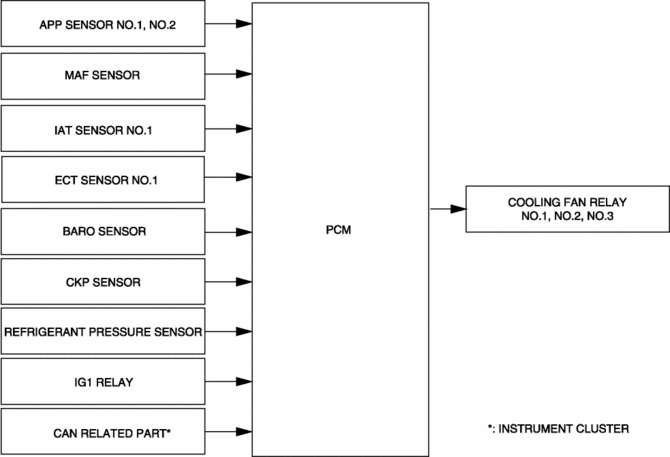
Operation
-
The PCM determines the demand airflow volume by the following conditions.
|
Demand airflow volume |
Cooling fan relay |
Cooling fan motor |
||
|
No.1 |
No.2/No.3 |
No.1 |
No.2 |
|
|
No airflow |
OFF |
OFF |
Stop |
Stop |
|
Small |
ON |
OFF |
Low-speed |
Low-speed |
|
Large |
ON |
ON |
High-speed |
High-speed |
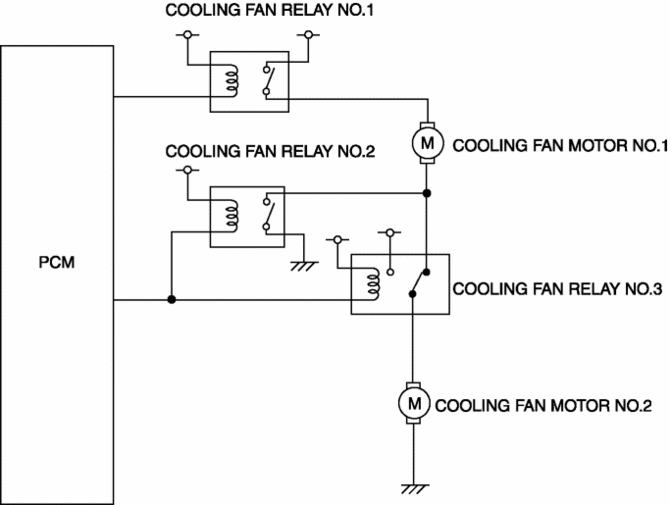
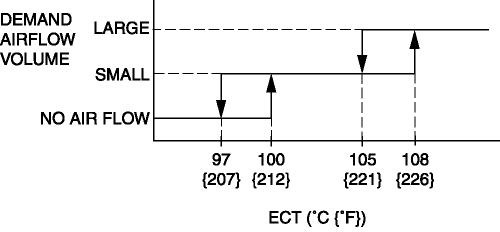
Engine coolant temperature condition
-
Controls the PCM output duty ratio according to the engine coolant temperature.
-
The control temperature while the engine coolant temperature is decreasing is controlled differently than when it is increasing.
A/C operation condition
-
Controls the demand airflow volume depending on the refrigerant pressure and vehicle speed when the A/C switch is on.
|
Operation condition |
Demand airflow volume |
|
No airflow |
|
Small |
|
Large |
After Cooling Control
-
If the ignition is switched off directly after continuous high engine-load travel, the PCM operates (demand airflow volume: low) the cooling fan for a maximum of 9 minutes when all of the following conditions are met due to the possibility that the engine may not restart as a result of a fuel supply malfunction caused by the high temperature.
-
Engine coolant temperature: 90°C {194 °F} or more
-
Accumulated amount of engine heat is extremely large
-
Driving record for vehicle speed of 25 km/h {16 mph} or more available
 Cooling System
Outline
Passing water resistance is reduced by improvement of the engine coolant
passage shape.
Pump efficiency is improved by changing the water pump impeller to the closed
impel ...
 Engine Coolant Leakage Inspection
WARNING:
Never remove the cooling system cap or loosen the radiator drain plug while
the engine is running, or when the engine and radiator are hot. Scalding engine
coolant and steam may ...
Other materials:
On Board Diagnostic System PID/Data Monitor Inspection [Fw6 A EL, Fw6 Ax EL]
1. Connect the M-MDS to the DLC-2.
2. After the vehicle is identified, select the following items from the initialization
screen of the M-MDS.
a. Select “DataLogger”.
b. Select “Modules”.
c. Select “TCM”.
3. Select the applicable PID from the PID table.
4. Verify the PID da ...
Rear Body Control Module (Rbcm) Removal/Installation
CAUTION:
If configuration is not performed when the rear body control module (RBCM)
is replaced with a new one, the vehicle specification information is not stored
in the rear body control module (RBCM) and the system will not operate normally.
When performing configuration, it ...
Rear Window Defroster/Outer Mirror Heater
Outline
Fogging is cleared from the rear window and outer mirror glass by heating
of the filament.
Structural view
System wiring diagram
Vehicles with full-auto air conditioner system
Vehicles with manual air conditioner system
Construction
Rear window defroster
...
