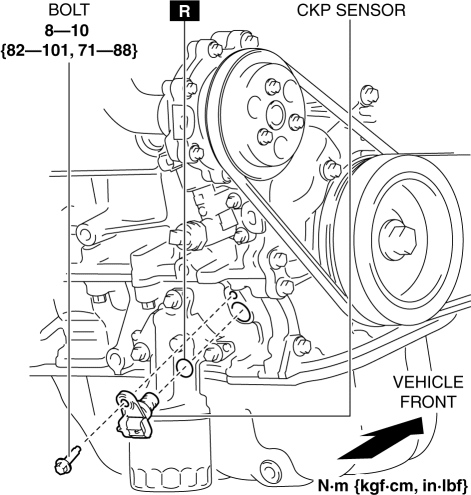
Mazda CX-5 Service & Repair Manual: Crankshaft Position (CKP) Sensor Removal/Installation
CAUTION:
-
When foreign material such as an iron chip is on the CKP sensor, it can cause abnormal output from the sensor because of flux turbulence and adversely affect the engine control. Be sure there is no foreign material on the CKP sensor when replacing.
-
Do not assemble the CKP sensor or change the installation position using any method other than the following. Otherwise, it could negatively affect engine controls, such as the ignition timing and fuel injection.
1. Disconnect the negative battery cable..
2. Lift up the vehicle.
3. Perform the following procedure for easier access.
a. Remove the service hole cover (installed to front under cover No.2) used to remove the oil filter..
b. Remove the front splash shield (RH)..
4. Disconnect the CKP sensor connector.
5. Remove the CKP sensor.

6. Install in the reverse order of removal.
 Crankshaft Position (CKP) Sensor Inspection
Visual Inspection
CAUTION:
When foreign material such as an iron chip is on the CKP sensor, it can cause
abnormal output from the sensor because of flux turbulence and adversely affect
...
 Crankshaft Position (CKP) Sensor
Purpose/Function
Detects the crankshaft speed as basic information for mainly determining
the fuel injection timing and ignition timing.
Detects the crankshaft speed and inputs it to ...
Other materials:
Heated Oxygen Sensor (HO2 S) Inspection
HO2S Inspection
1. Connect the M-MDS to the DLC?2.
2. Switch the ignition ON (engine on).
3. Warm up the engine to normal operating temperature.
4. Access the following PIDs using the M-MDS..
VSS (Vehicle speed)
RPM (Engine speed)
O2S12 (HO2S output voltage)
5. D ...
Oil Control Valve (OCV) Removal/Installation [Skyactiv G 2.0]
WARNING:
A hot engine can cause severe burns. Turn off the engine and wait until it
is cool before servicing.
1. Disconnect the negative battery cable..
2. Remove the plug hole plate..
3. Remove the ignition coil/ion sensors..
4. Remove the cylinder head cover..
5. Remove in ...
Liftgate Recess Removal/Installation
1. Insert a tape-wrapped flathead screwdriver in the position indicated by the
arrow in the figure and detach hooks A.
2. Remove the liftgate recess in the direction of the arrow shown in the figure
avoiding hooks B.
3. Install in the reverse order of removal. ...
