Mazda CX-5 Service & Repair Manual: Awd Control Module Removal/Installation
CAUTION:
-
When performing configuration, it is necessary to read the coupling component calibration data from the AWD control module before replacing it. Connect the M-MDS to the vehicle and perform vehicle identification before removing the AWD control module. The coupling component calibration data is temporarily stored in the M-MDS.
-
If the configuration was not performed after replacing with a new AWD control module, the following conditions can be considered as occurring because the coupling component calibration data was not recorded in the AWD control module.
-
System does not operate normally.
-
Problem with coupling component durability may occur.
NOTE:
-
The AWD control module prior to replacement stores the coupling component calibration data.
-
If coupling component calibration data from the AWD control module prior to replacement cannot be read, perform the coupling component calibration data writing..
1. When replacing the AWD control module, perform the configuration..
2. Disconnect the negative battery cable..
3. Remove the front scuff plate..
4. Remove the front side trim..
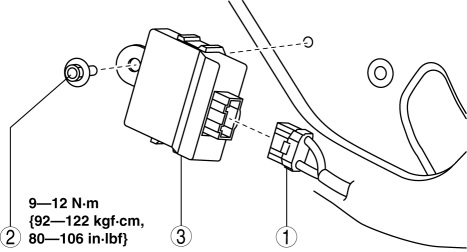
|
1 |
Connector |
|
2 |
Bolt |
|
3 |
AWD control module (See AWD Control module Removal Note.) |
5. Remove in the order indicated in the table.
6. Install in the reverse order of removal.
NOTE:
-
If configuration cannot be performed by reading/writing of the coupling component calibration data, perform the coupling component calibration data writing..
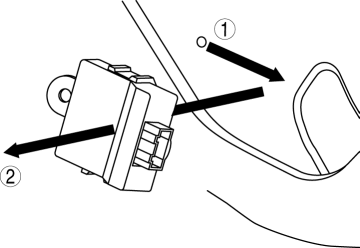
AWD Control module Removal Note
1. Slide the AWD control module toward the connector, and remove it.
 Awd Control Module Inspection
NOTE:
AWD CM terminal voltage can vary depending on measuring conditions and vehicle
aging, resulting in misdiagnosis. Therefore, it is necessary to perform an overall
inspection of the ...
 Awd Solenoid Inspection
1. Disconnect the negative battery cable.
2. Disconnect the AWD solenoid connector.
3. Measure resistance between AWD solenoid connector terminals A and B.
If the resistance is not wit ...
Other materials:
Front Body Control Module (Fbcm) Inspection
1. Remove the fuse box cover..
2. Remove the front body control module (FBCM) from the fuse box..
3. Verify that the voltages of each of the terminals are as indicated in the
Terminal Voltage Table (Reference).
If the voltage is not as indicated in the table, inspect the parts under
...
Discharge Headlight Service Warnings
Discharge Headlight Service Warnings
When replacing a discharge headlight bulb, performing the servicing with
the negative battery cable connected or in a wet work area could result in electrocution.
When replacing a discharge headlight bulb, perform the servicing under the following
...
Rear Door Garnish Removal/Installation
WARNING:
Using a utility knife with bare hands can cause injury. Always wear gloves
when using a utility knife.
Front
1. Using a tape-wrapped fastener remover, remove clips A in the direction of
arrow (1), (2) shown in the figure.
2. Remove the double-sided adhesive tape in the ...
