Mazda CX-5 Service & Repair Manual: Sirius Satellite Radio Unit
Purpose
-
Satellite radio programming can be listened to.
Function
-
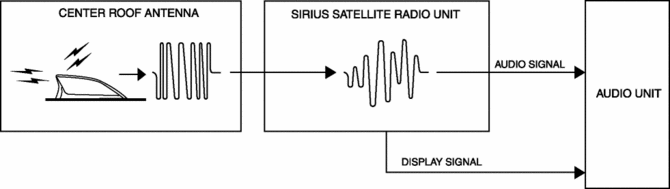
The voltage signal sent from the center roof antenna (SIRIUS satellite radio antenna) is output to the audio unit.
Construction
-
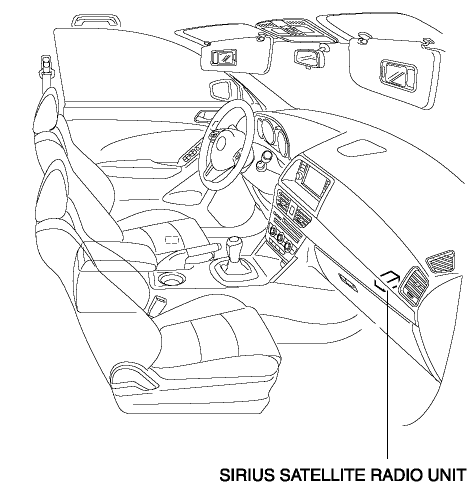
The SIRIUS satellite radio unit is installed to the interior of the glove compartment.
-
Consists of a bracket for securing to the dashboard member, and a tuner.
Terminal layout and signal
|
Terminal |
Signal |
|
|
|
A |
Power ground |
|
B |
— |
|
|
C |
Output RH (+) |
|
|
D |
— |
|
|
E |
Output LH (+) |
|
|
F |
— |
|
|
G |
Signal ground |
|
|
H |
— |
|
|
I |
— |
|
|
J |
— |
|
|
K |
CAN_L |
|
|
L |
CAN_H |
|
|
M |
— |
|
|
N |
— |
|
|
O |
ACC |
|
|
P |
B+ |
|

Operation
1. The SIRIUS satellite radio unit detects the radio station selected by the user from the electric signal sent from center roof antenna (SIRIUS satellite radio antenna).
2. The detected radio broadcast audio signal and the video signal are sent to the audio unit.
3. The audio unit outputs the audio and video signals received from the SIRIUS satellite radio unit.
Fail-safe
-
Function not equipped.
 Rear Mount Camera Removal/Installation
CAUTION:
The audio unit communicates with the rear mount camera and records the presence/non-presence
of the rear mount camera when the ignition is switched to ACC or ON (engine
off or o ...
 Sirius Satellite Radio Unit Removal/Installation
CAUTION:
The audio unit communicates with the SIRIUS satellite radio unit and records
the presence/non-presence of the SIRIUS satellite radio unit when the ignition
is switched to ACC or ...
Other materials:
Lift Motor Removal/Installation
WARNING:
Handling a side air bag improperly can accidentally operate (deploy) the
air bag, which may seriously injure you. Read the service warnings/cautions
in the Workshop Manual before handling the front seat (side air bag integrated)..
1. Switch the ignition off (LOCK).
2. ...
When Liftgate Cannot be Opened
When Liftgate Cannot be Opened
If the vehicle battery is dead or there is a malfunction in the electrical system
and the liftgate can not be opened, perform the following procedure as an emergency
measure to Open it: 1. Remove the cap on the interior surface of the liftgate with
a flathead sc ...
Rear Door Trim Removal/Installation
1. Insert a tape-wrapped flathead screwdriver in the position indicated by the
arrow (1) in the figure and remove the inner handle cover while detach tabs A, pin
B.
2. Remove the screw C.
3. Remove the cover D, then remove the screw E.
4. Take the shaded area shown in the figur ...
