Mazda CX-5 Service & Repair Manual: Side Step Molding Removal/Installation
1. Set the rear over fender aside..
2. Insert a tape-wrapped flathead screwdriver shown in the figure and remove the clip A in the direction of arrow (1).
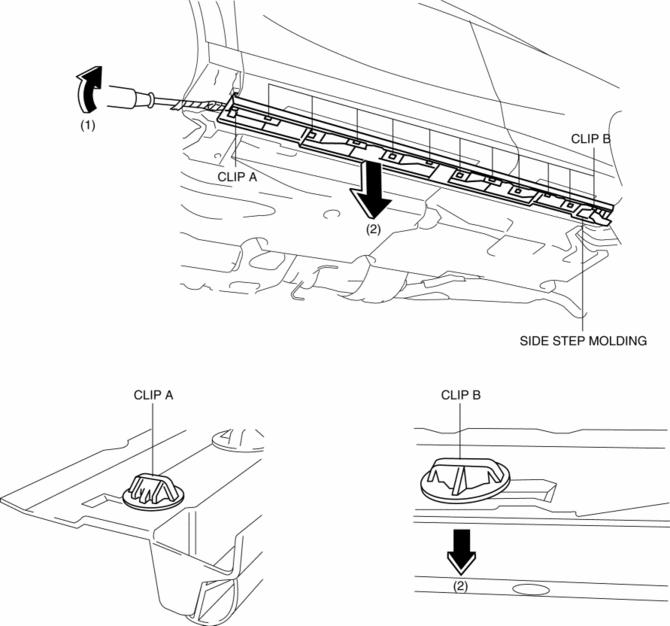
3. Slide the side step molding in the direction of the arrow (2) shown in the figure and remove clips B from side step molding.
4. After removing the side step molding, remove clip A, clips B from the body using a fastener remover.
5. Install clip A, clips B to the side step molding.
6. Install in the reverse order of removal.
 Side Sill Panel Removal [Panel Replacement]
Symbol Mark
Removal Procedure
Side sill (front side)
1. Rough cut the 2 locations indicated by (A) shown in the figure.
2. Drill the 18 locations indicated by (B) shown in the figure.
3 ...
 Speaker Grille Removal/Installation
Center Speaker Grille
1. Insert a tape-wrapped flathead screwdriver into shown in the figure and remove
hooks A in the direction of arrow (1).
2. Take the shaded area shown in the figure, and ...
Other materials:
Engine Front Cover
Purpose, Function
The engine front cover covers the front of the engine to prevent engine oil
spillage, noise leakage, and foreign material penetration.
Construction
The engine front cover is installed to the front of the engine.
The lightweight engine front ...
Steering Abbreviations
AAS
Active Adaptive Shift
ABS
Antilock Brake System
ABDC
After Bottom Dead Center
ACC
Accessories
AFS
Adaptive Front Lighting System
ALC
...
Relay Inspection
Relay Type
Connector type
Part name
Type A
TNS relay
A/C relay
Headlight HI relay
Headlight LO relay
Headlight LO relay (LH)
Horn relay
ACC rel ...
