Mazda CX-5 Service & Repair Manual: Oil Seal (Control Valve Body) Replacement [Fw6 A EL, Fw6 Ax EL]
1. Disconnect the negative battery cable..
2. Remove the air cleaner component..
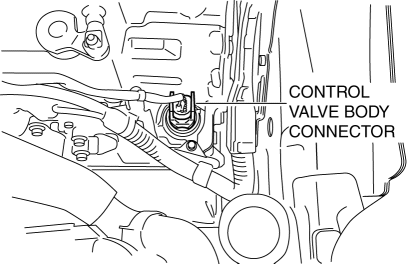
3. Disconnect the control valve body connector.
CAUTION:
-
Make sure that your hand does not touch the terminal as the connector terminal could be damaged.
-
Water or foreign objects entering the connector can cause a poor connection or corrosion. Be sure not to drop water or foreign objects on the connector when disconnecting it.
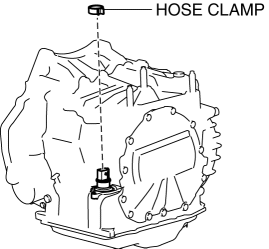
4. Remove the hose clamp.
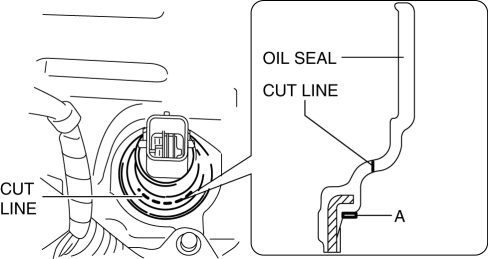
5. Cut the oil seal using a utility knife as shown in the following illustration.

CAUTION:
-
Do not damage the transaxle case.
-
Do not damage the control valve body coupler connector.
-
To prevent foreign matter penetration, clean the oil seal area thoroughly and cut the oil seal so as not to leave cutting fragments.
6. Using a tape-wrapped flathead screwdriver, remove the oil seal from the transaxle case.

NOTE:
-
Remove the oil seal by tapping the tip of a tape-wrapped flathead screwdriver on the inner circumference surface A area of the oil seal.
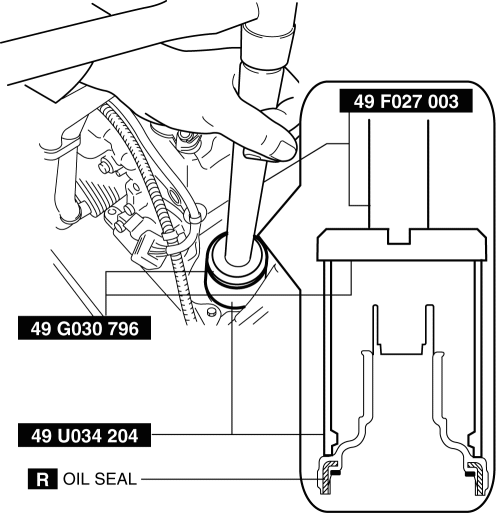
7. Temporarily install the oil seal (control valve body) by hand.
8. Using the SSTs
and a hammer, install the oil seal (control valve body) so that it is not tilted and there is no height difference between the transaxle case surface and the end surface of the oil seal.
CAUTION:
-
When installing the oil seal (control valve body), do not mistakenly hit the control valve body connector with the hammer. Otherwise the control valve body connector could be damaged making it no longer waterproof.
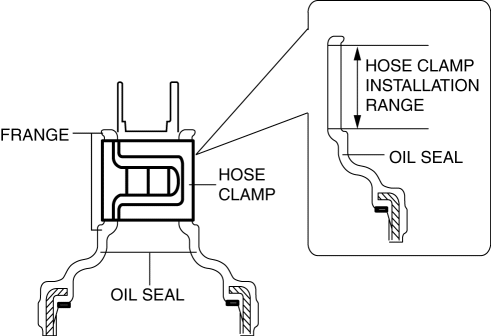
9. Install a new hose clamp to the position shown in the figure.
CAUTION:
-
If the hose clamp is reused it could cause ATF leakage, therefore use a new hose clamp.
-
Install the hose clamp tab to within the range shown in the figure.
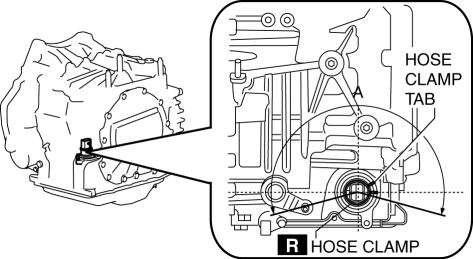
A: 210°
-
Install the hose clamp so that it does not interfere with the top and bottom flanges of the oil seal to maintain the waterproofing integrity.
10. Connect the control valve body connector.
CAUTION:
-
Make sure that your hand does not touch the terminal as the connector terminal could be damaged.
-
Verify that there is no fluid or foreign matter adhering to the connector before connecting the connector.
-
Insert the connector straight as the connector terminal could be damaged.
-
Rotate the connector lever until a click is heard.
11. Install the air cleaner component..
12. Connect the negative battery cable..
 Oil Pump
Outline
The oil pump has a mechanism for feedback control of oil pressure. As a result,
an oil pressure increase of more than the set pressure is suppressed and oil
pump drive resistance ...
 Oil Seal (Coupling Component) Replacement
1. Drain the differential oil into a container.
2. Remove the coupling component..
3. Remove the oil seal from the differential carrier using a screwdriver or similar
tool.
4. Apply differenti ...
Other materials:
Front Shock Absorber Disposal
WARNING:
Whenever drilling into a front shock absorber, wear protective eye wear.
The gas in the front shock absorber is pressurized, and could spray metal chips
into the eyes and face when drilling.
1. Place the shock absorber on a level surface or with the piston pointing d ...
Fuel Gauge Sender Unit Inspection [2 Wd]
NOTE:
For the fuel gauge sender unit removal/installation, refer to the fuel pump
removal/installation because the fuel gauge sender unit is integrated with the
fuel pump..
1. Verify that the resistance at fuel gauge sender unit terminals D and C is
as indicated in the table ac ...
Control System Personalization Features Setting Procedure
1. Connect the M-MDS to DLC-2.
2. After the vehicle is identified, select the following items from the initial
screen of the M-MDS.
Select the “Module Programming”.
Select “Programmable Parameters”.
Select menu in the R_BCM.
3. Select an item name, and then ...
