Mazda CX-5 Service & Repair Manual: Relay And Fuse Block Disassembly/Assembly
1. Insert a tape-wrapped flathead screwdriver into the service hole in the position shown in the figure.
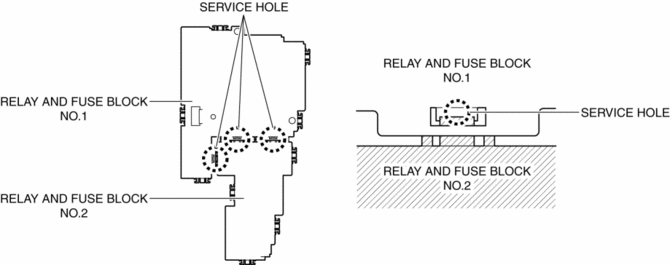
2. Move the flathead screwdriver in the direction of the arrow (1) shown in the figure, pull up relay and fuse block No.1 in the direction of the arrow (2) shown in the figure, and detach the relay and fuse block No.2 tab from relay and fuse block No.1.
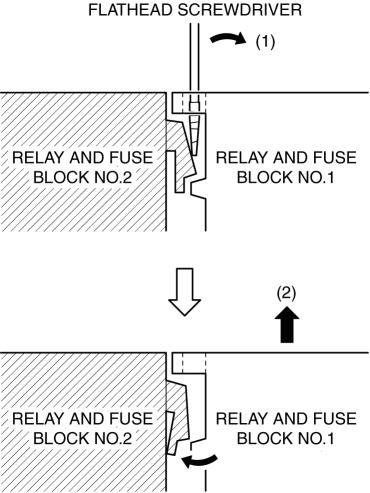
3. Detach all the relay and fuse block No.2 tabs from relay and fuse block No.1, and remove relay and fuse block No.1 from relay and fuse block No.2.
4. Assemble in the reverse order of disassembly.
 Relay And Fuse Block
Purpose
Relays and fuses used by each system are grouped and housed together for
smooth inspection and replacement servicing.
Function
Relays and fuses used by each system are g ...
 Relay And Fuse Block Middle Cover Disassembly/Assembly
1. Insert a tape-wrapped flathead screwdriver into the service hole in the position
shown in the figure.
2. While pressing the relay and fuse block middle cover tab in the direction
of arrow ...
Other materials:
Bluetooth® Audio
Applicable Bluetooth® specification Ver. 2.0 or higher
Response profile
• A2DP (Advanced Audio Distribution Profile)
Ver. 1.0/1.2
• AVRCP (Audio/Video Remote Control Profile)
Ver. 1.0/1.3/1.4
A2DP is a profile which transmits only audio to the Bluetooth® unit. If your
Bluetooth® aud ...
Clock
Purpose
The clock displays the current time, the passenger and rear seat belt status,
the passenger air bag deactivation (PAD) switch status, and the seat warmer
operation status to notify the user.
Function
Stores the time set by the user and displays the current time.
...
Shift Control Module Removal/Installation [C66 M R]
Removal
1. Shift the shift lever to the neutral position.
2. Remove the plug hole plate..
3. Disconnect the negative battery cable..
4. Remove the air cleaner and air hose as a single unit..
5. Remove the battery and battery tray..
6. Disconnect the control cable from the transaxle.
a. ...
