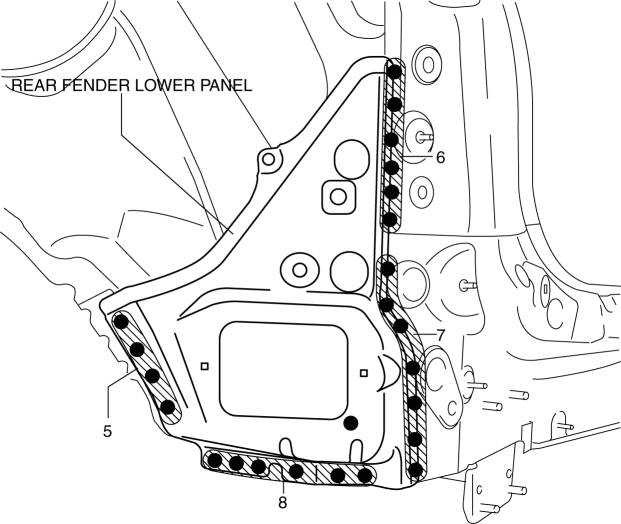
Mazda CX-5 Service & Repair Manual: Rear Fender Lower Panel Installation [Panel Replacement]
Symbol Mark

Installation Procedure
1. When installing new parts, measure and adjust the body as necessary to conform with standard dimensions.
2. After temporarily installing new parts, make sure the related parts fit properly.
3. Spot weld the 26 locations shown in the figure, then install the rear fender lower panel.
 Rear End Panel Removal [Panel Replacement]
Symbol Mark
Removal Procedure
1. Drill the 77 locations indicated by (A) shown in the figure.
2. Drill the 18 locations indicated by (B) from room side shown in the figure.
3. Remove th ...
 Rear Fender Lower Panel Removal [Panel Replacement]
Symbol Mark
Removal Procedure
1. Drill the 20 locations shown in the figure.
2. Remove the rear fender lower panel. ...
Other materials:
Glass Antenna
Purpose, Function
The RDS (Radio Data System) converts radio broadcast waves to electric signals
and sends the signals to the audio unit.
Construction
An antenna with excellent noise resistance has been adopted to the rear window
glass.
Fail-safe
Function n ...
Back Up Light Switch Removal/Installation [C66 M R]
1. Disconnect the negative battery cable..
2. Remove the front under cover No.2..
3. Remove in the order indicated in the table.
4. Install in the reverse order of removal.
1
Back-up light switch connector
2
Back-up light switch
...
Camshaft Position (CMP) Sensor
Purpose/Function
Detects the camshaft speed as basic information for mainly determining the
fuel injection timing and ignition timing.
Detects the camshaft speed and inputs it to the PCM as a CMP signal.
Construction
Intake CMP sensor
Installed on the cylinder head.
...
