Mazda CX-5 Service & Repair Manual: Condenser
Purpose
-
The condenser cools the high-temperature, highly pressurized refrigerant.
Function
-
The condenser cools the high-temperature, highly pressurized gaseous refrigerant compressed by the A/C compressor using the outside air, and changes it to liquid refrigerant.
Construction
-
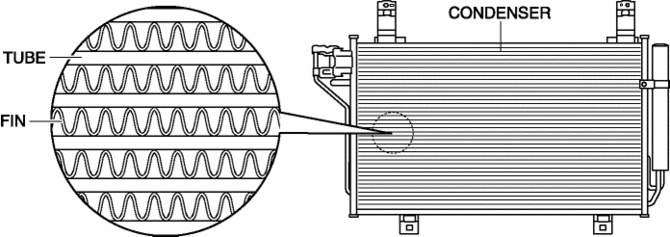
The condenser is installed to the front of the radiator.
-
The condenser consists of the tube which passes refrigerant, and the heat radiation fin.
-
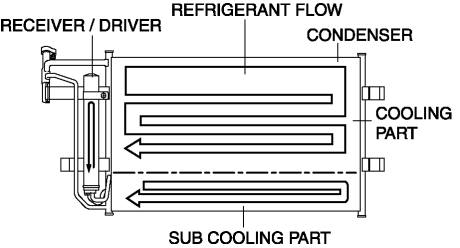
A sub-cooling condenser has been adopted.
-
The sub-cooling condenser is integrated with the multi-flow condenser and the receiver driver.
-
The sub-cooling condenser separates the refrigerant, cooled once by the condenser, into vapor and liquid using the receiver/drier, and by returning it to the sub-cooling part of the condenser again to cool.
-
As a result, liquefaction of the refrigerant is promoted and cooling performance is improved.
Operation
-
The high-temperature, highly pressurized gaseous refrigerant sent from the A/C compressor passes through the tube in the condenser.
-
When the air blown from the outside is exposed to the heat radiation fin, the heat of the refrigerant is captured by heat exchange, and the refrigerant changes from a gas to a liquid.
-
The liquid refrigerant is sent to the expansion valve via the receiver/drier.
Fail-safe
-
Function not equipped.
 Climate Control Unit [Manual Air Conditioner]
Purpose
The climate control unit performs air conditioning according to the operation
by the users and the driving conditions of the vehicle.
Function
The climate control unit d ...
 Condenser Inspection
1. Inspect the condenser for cracks, damage, and oil leakage.
If there is any malfunction, replace the condenser.
2. Visually inspect for bent fins for clogging of foreign material.
...
Other materials:
Throttle Position (TP) Sensor
Purpose/Function
Detects the throttle valve opening/closing condition, which operates in accordance
with the accelerator pedal operation, as basic information for mainly determining
the fuel injection amount.
Detects the throttle valve opening/closing condition, which operates i ...
Starting System [Skyactiv G 2.0]
Outline
A coaxial reduction type starter has been adopted.
Structural View
Structure
Consists of the following parts:
Starter
(See STARTER [SKYACTIV-G 2.0].)
Starter relay
(See STARTER REL ...
Steering Wheel And Column Removal/Installation
WARNING:
Handling the air bag module improperly can accidentally operate (deploy)
the air bag module, which may seriously injure you. Read the service warnings
and cautions before handling the air bag module..
The steering column (EPS motor) temperature increases directly after ...
