Mazda CX-5 Service & Repair Manual: Rear Fender Lower Panel Removal [Panel Replacement]
Symbol Mark

Removal Procedure
1. Drill the 20 locations shown in the figure.
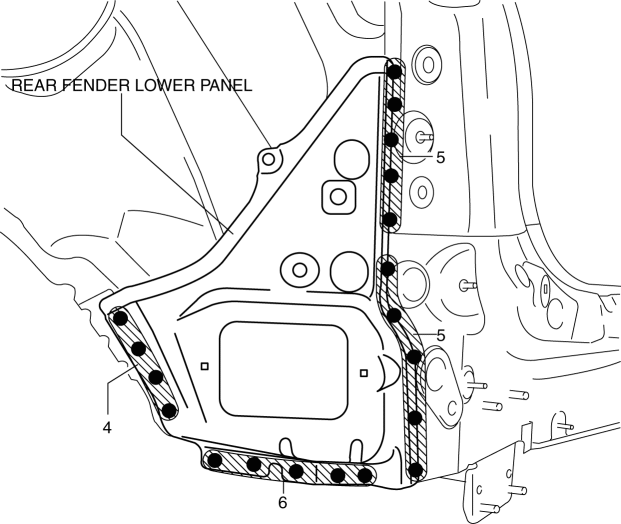
2. Remove the rear fender lower panel.
 Rear Fender Lower Panel Installation [Panel Replacement]
Symbol Mark
Installation Procedure
1. When installing new parts, measure and adjust the body as necessary to conform
with standard dimensions.
2. After temporarily installing new parts, make ...
 Rear Fender Panel Installation [Panel Replacement]
Symbol Mark
Installation Procedure
1. When installing new parts, measure and adjust the body as necessary to conform
with standard dimensions.
2. Drill holes for the plug welding before inst ...
Other materials:
Liquid Crystal Display (LCD)
Outline
The LCD displays vehicle information in the instrument cluster.
The instrument cluster performs LCD fail-safe..
Function/Construction
The instrument cluster configures the indication of the LCD based on the
CAN signals sent from the related modules and displays ...
Upper Panel Removal/Installation
1. Disconnect the negative battery cable..
2. Remove the following parts:
a. Front console box.
b. Shift lever knob (MTX).
c. Shift panel.
3. Open the console lid.
4. Remove the button, then open the fastener.
5. Take the shaded area shown in the figure, and remove the upper panel ...
Brakes
Abbreviations
AAS
Active Adaptive Shift
ABS
Antilock Brake System
ABDC
After Bottom Dead Center
ACC
Accessories
AFS
Adaptive Front Lighting System
...
