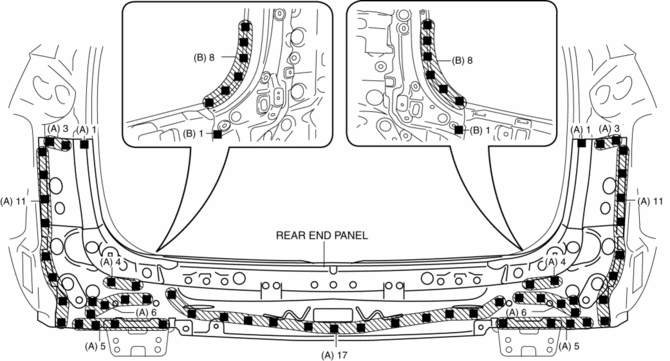
Mazda CX-5 Service & Repair Manual: Rear End Panel Installation [Panel Replacement]
Symbol Mark

Installation Procedure
1. When installing new parts, measure and adjust the body as necessary to conform with standard dimensions.
2. Drill holes for the plug welding before installing the new parts.
3. After temporarily installing new parts, make sure the related parts fit properly.
4. Plug weld the 77 locations indicated by (A) shown in the figure.
5. Plug weld the 18 locations indicated by (B) from room side shown in the figure, then install the rear end panel.

 Rear Bumper Removal/Installation
CAUTION:
Affix the protective tape to the position (body side) shown in the figure.
1. Disconnect the negative battery cable..
2. Remove the rear combination light..
3. Remove ...
 Rear End Panel Removal [Panel Replacement]
Symbol Mark
Removal Procedure
1. Drill the 77 locations indicated by (A) shown in the figure.
2. Drill the 18 locations indicated by (B) from room side shown in the figure.
3. Remove th ...
Other materials:
Engine Coolant Temperature (ECT) Sensor
Purpose/Function
Detects the ECT as basic information for mainly determining the fuel injection
amount.
Detects the ECT and inputs it to the PCM as an ECT signal.
The ECT sensor No.2 is only used for OBD.
Construction
ECT sensor No.1
Installed to the water out ...
Relay And Fuse Block
Purpose
Relays and fuses used by each system are grouped and housed together for
smooth inspection and replacement servicing.
Function
Relays and fuses used by each system are grouped and housed together.
Construction
Installed in the engine compartment.
...
Antilock Brake System (ABS)
The ABS control unit continuously monitors the speed of each wheel. If one wheel
is about to lock up, the ABS responds by automatically releasing and reapplying
that wheel's brake.
The driver will feel a slight vibration in the brake pedal and may hear a chattering
noise from the brake sy ...
