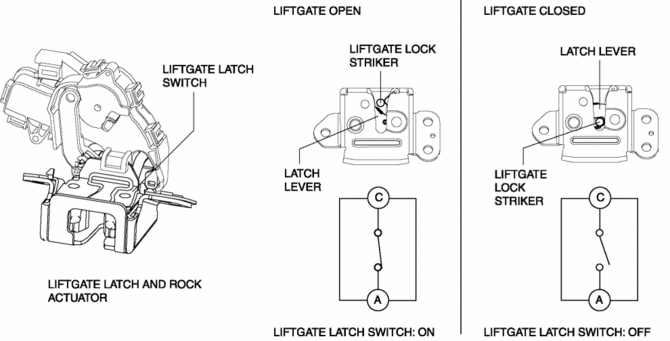
Mazda CX-5 Service & Repair Manual: Liftgate Latch Switch
Purpose, Function
-
The switch turns on/off in conjunction with the rotation of the latch lever, and it detects the open/closed condition of the liftgate by the voltage value which is changed by the rear body control module (RBCM).
Construction
-
The switch is turned on/off by the rotation of the latch lever.
-
When the liftgate is completely closed, the switch turns off (contact point: Open)

Operation
Liftgate closed (latched) operation
1. When the liftgate is closed, the liftgate lock striker enters the latch lever groove.
2. When the liftgate further closes, the latch lever is pressed by the liftgate lock striker and it rotates.
3. When the liftgate is completely closed, the latch lever is in the latched condition pressing the liftgate latch switch, which turns the switch off.
Liftgate open (unlatch) operation
1. When the liftgate lock actuator operates to open the liftgate, the latch lever is in an unlatched condition, and the liftgate latch switch turns on.
Fail-safe
-
Function not equipped.
 Liftgate Latch And Lock Actuator Removal/Installation
1. Disconnect the negative battery cable..
2. Remove the following parts:
a. Liftgate upper trim.
b. Liftgate side trim.
c. Liftgate lower trim.
3. Disconnect the connector.
4. Remove ...
 Liftgate Latch Switch Inspection
1. Disconnect the negative battery cable..
2. Remove the following parts:
a. Liftgate upper trim.
b. Liftgate side trim.
c. Liftgate lower trim.
d. Liftgate latch and lock actuator.
3. Ver ...
Other materials:
D Pillar Reinforcement (Lower) Installation [Panel Replacement]
Symbol Mark
Installation Procedure
1. When installing new parts, measure and adjust the body as necessary to conform
with standard dimensions.
2. Drill holes for the plug welding before installing the new parts.
3. After temporarily installing new parts, make sure the related parts fit p ...
Owner Maintenance Precautions
The owner or a qualified service technician should make these vehicle inspections
at the indicated intervals to ensure safe and dependable operation.
Bring any problem to the attention of an Authorized Mazda Dealer or qualified
service technician as soon as possible.
When Refueling
• Brake ...
Center Roof Antenna Removal/Installation
1. Disconnect the negative battery cable..
2. Remove the following parts:
a. Front scuff plate.
b. Rear scuff plate.
c. B-pillar lower trim.
d. Front seat belt adjusting cover.
e. Front seat belt upper anchor installation bolt.
f. B-pillar upper trim.
g. Trunk board.
h. Trunk end t ...
