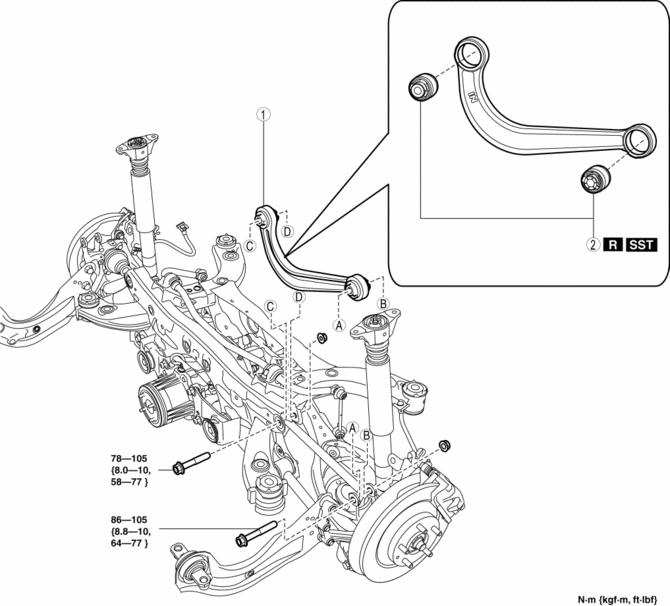
Mazda CX-5 Service & Repair Manual: Rear Upper Arm Removal/Installation [Awd]
WARNING:
-
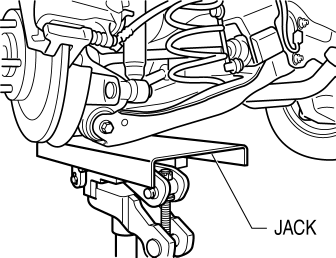
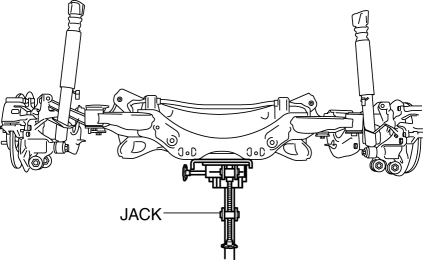
Verify that the crossmember is securely supported by a jack. If the rear crossmember falls off, it can cause serious injury or death, and damage to the vehicle.
CAUTION:
-
Performing the following procedures without first removing the rear ABS wheel-speed sensor may possibly cause an open circuit in the harness if it is pulled by mistake. Before performing the following procedures, disconnect the rear ABS wheel-speed sensor (axle side) and fix it to an appropriate place where the sensor will not be pulled by mistake while servicing the vehicle.
NOTE:
-
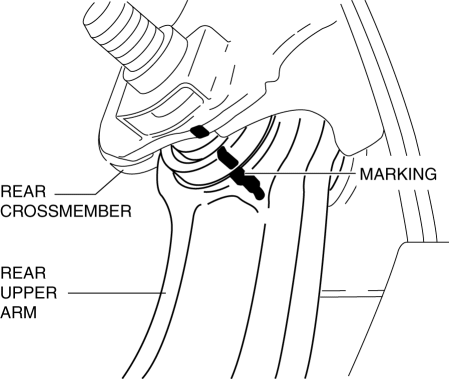
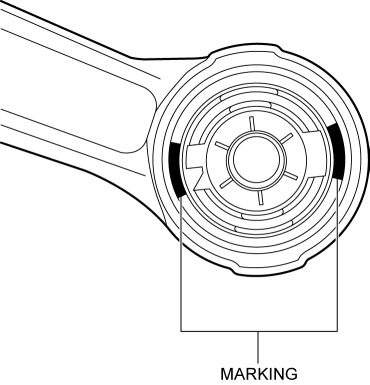
Mark the position before removing the rear upper arm.
-
Align the rear crossmember and rear upper arm markings when installing the rear upper arm.
-
Tighten the rear upper arm inner bolt completely before installing the rear crossmember component to the vehicle.
1. Disconnect the rear auto leveling sensor link. (With auto leveling sensor).
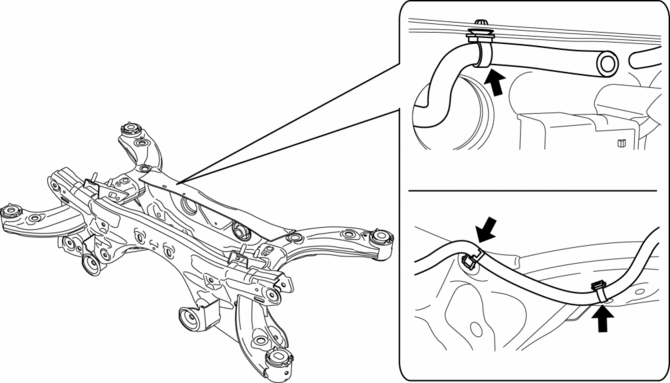
2. Disconnect the wiring harness clips and connectors installed to the rear crossmember.
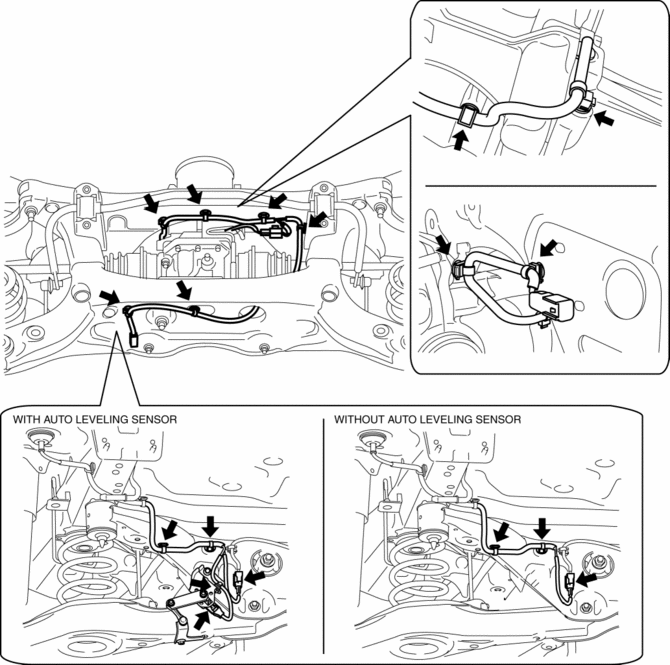
3. Set the rear differential breather hose aside.
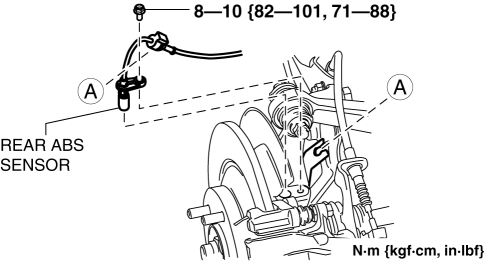
4. Disconnect the rear ABS wheel-speed sensor wiring harness installed to the hub support and set it aside..
5. Remove the propeller shaft..
6. Remove the TWC..
7. Remove the rear coil spring..
8. Remove in the order indicated in the table.
9. Install in the reverse order of removal.
10. Inspect the wheel alignment and adjust it if necessary..
|
1 |
Rear upper arm (See Rear Upper Arm Removal Note.) (See Rear Upper Arm Installation Note.) |
|
2 |
Rear upper arm bushing (See Rear Upper Arm Removal Note.) (See Rear Upper Arm Installation Note.) |
Rear Upper Arm Removal Note
1. Jack up the vehicle to the unloaded condition, and support the rear trailing link component using a jack.
2. Align the rear crossmember component and rear upper arm and mark them.
3. Support the rear crossmember component with a jack and remove the rear crossmember installation nuts.
4. Press down on the rear crossmember component slowly until the rear upper arm inside installation bolts can be removed using a jack.
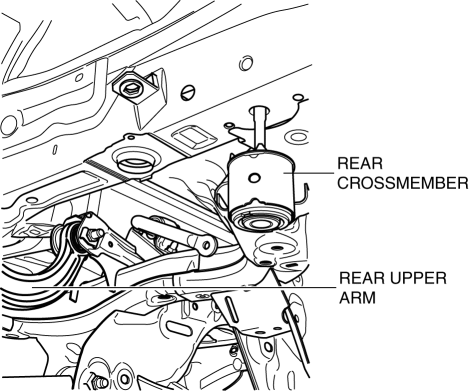
5. Remove the rear upper arm.
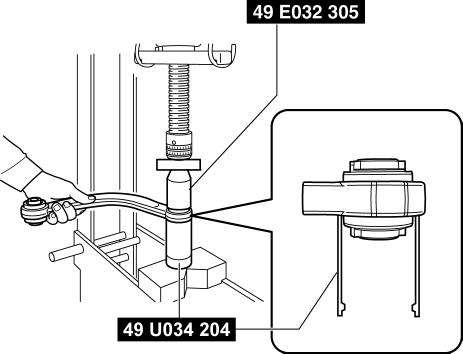
Rear Upper Arm Bushing Removal Note
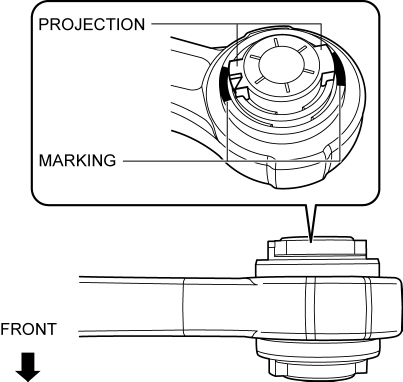
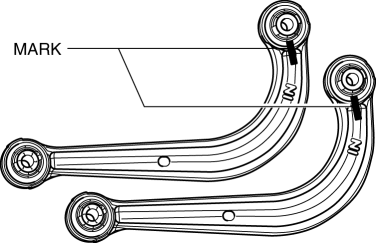
1. Mark the rear upper arm as shown in the figure.
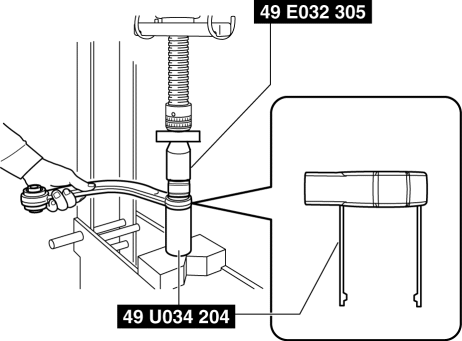
2. Press the rear upper arm bushing out using the SSTs
.
CAUTION:
-
Set using the SST
(49 U034 204)
as shown in the figure to prevent damaging the rear upper and rear upper arm bushing and remove the rear upper arm bushing.
Rear Upper Arm Bushing Installation Note
1. Mark the new rear upper arm bushing as shown in the figure.
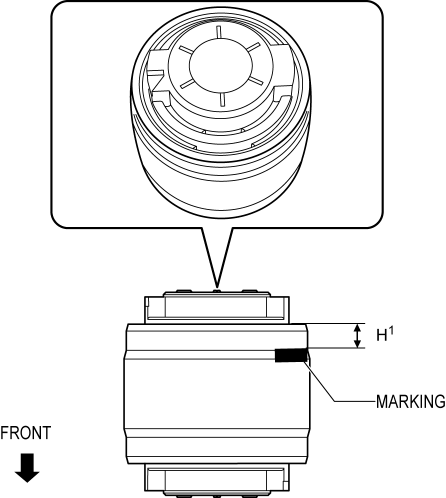
H1: 6.0 mm {0.24 in}
2. Align the projection of a new rear upper arm bushing with the marks placed during removal.
3. Press fit the rear upper arm bushing until the marks placed in Step 1 cannot be seen using the SSTs
.
CAUTION:
-
Set using the SST
(49 U034 204)
as shown in the figure to prevent damaging the rear upper arm and rear upper arm bushing and install the rear upper arm bushing.
NOTE:
-
Be careful when press-fitting the rear upper arm bushing because the bushing height of the inner and outer sides differs.
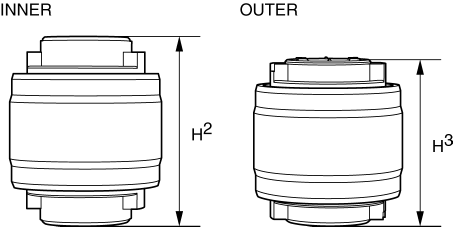
H2: 49.5 mm {1.95 in} H3: 44.5 mm {1.75 in}
4. After installing the rear upper arm bushing, verify that it is installed to the position shown in the figure.

H4: 24.0±0.6 mm {0.945±0.02 in}
Rear Upper Arm Installation Note
1. Place alignment mark on the new rear upper arm in the same positions as the removed rear upper arm.
2. Install the rear upper arm.
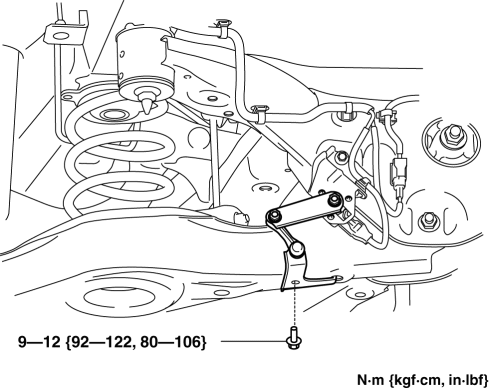
3. Lift up the rear crossmember component using a jack and install the rear crossmember installation bolts.
-
Tightening torque
-
91—111 N·m {9.3—11 kgf·m, 68—81 ft·lbf}
 Rear Stabilizer Removal/Installation [Awd]
WARNING:
Verify that the rear crossmember is securely supported by a jack. If the
rear crossmember falls off, it can cause serious injury or death, and damage
to the vehicle.
CAUTI ...
 Transfer
Purpose, Function
A transfer with simple, one-axis construction has been adopted for size and
weight reduction.
A thinner transfer case has been adopted for weight reduction.
C ...
Other materials:
Hood
Purpose/Function
The hood is constructed with a large space between the front end of the hood
and the engine to absorb an impact.
Construction
The hood stiffener positioned at the front end of the hood is shaped so that
it collapses easily during an impact. In addition, the ...
Drive Belt Removal/Installation
WARNING:
A hot engine can cause severe burns. Turn off the engine and wait until it
is cool before servicing.
NOTE:
Remove/install the drive belt from the underside of the vehicle.
Generator Drive Belt Removal/Installation
CAUTION:
To prevent damage to the dri ...
Tire Labeling
Federal law requires tire manufacturers to place standardized information on
the sidewall of all tires. This information identifies and describes the fundamental
characteristics of the tire and also provides a tire identification number for safety
standard certification and in case of a recall ...
