Mazda CX-5 Service & Repair Manual: Rear Bumper Reinforcement Removal/Installation
1. Disconnect the negative battery cable..
2. Remove the following parts:
a. Rear splash shield.
b. Rear combination light.
c. Rear bumper.
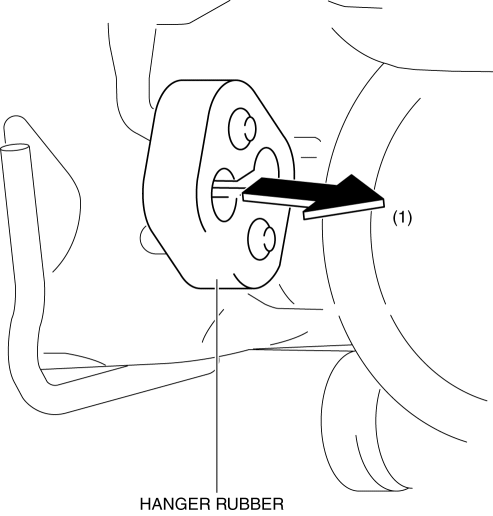
3. Remove the hanger rubber in the direction of the arrow (1) shown in the figure.
4. Remove nuts.
CAUTION:
-
Removing the rear bumper reinforcement without supporting it could cause the rear bumper reinforcement to fall and cause serious injury. Always perform the procedure with at least another person to prevent the rear bumper reinforcement from falling.
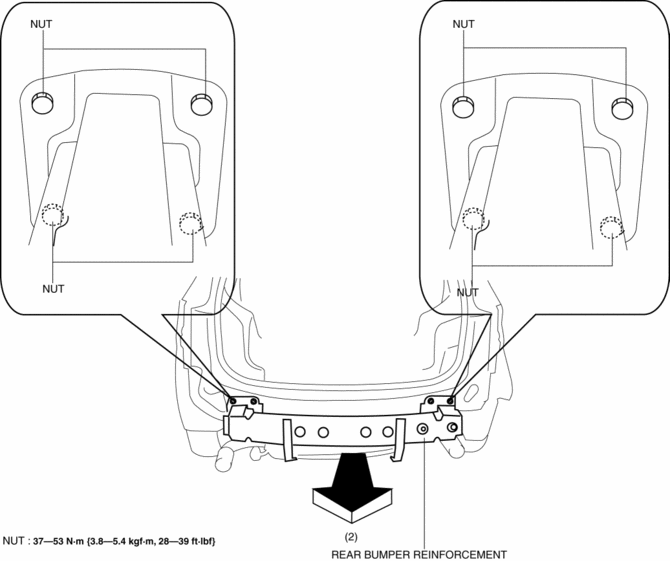
5. Remove the rear bumper reinforcement in the direction of the arrow (2) shown in the figure.
6. Install in the reverse order of removal.
 Rear Bumper Disassembly/Assembly
1. Disassemble in the order indicated in the table.
1
Screw
2
Reflector
3
Rear bumper face
2. Assemble ...
 Rear Bumper Removal/Installation
CAUTION:
Affix the protective tape to the position (body side) shown in the figure.
1. Disconnect the negative battery cable..
2. Remove the rear combination light..
3. Remove ...
Other materials:
No.27 Fuel Refill Concerns
27
FUEL REFILL CONCERNS
DESCRIPTION
Fuel tank does not fill smoothly.
POSSIBLE CAUSE
PCM DTC is stored.
Non-return valve malfunction
Pressure control v ...
Interior Lighting System
Outline
A room light control system has been adopted in which illumination time and
illumination level of the interior lights change.
The rear body control module (RBCM) performs room light control system fail-safe..
Structural View
System Wiring Diagram
...
Wiper And Washer Switch Removal/Installation
1. Switch the ignition ON (engine off or on).
2. Open the driver's door.
3. Switch the ignition OFF.
4. Disconnect the negative battery cable..
5. Remove the column cover..
6. Rotate the steering wheel in the direction of the arrow shown in the figure
to the angle where the service h ...
