Mazda CX-5 Service & Repair Manual: Rear Oil Seal Replacement
1. Remove the transaxle..
2. Remove the flywheel (MTX) or the drive plate (ATX)..
3. Remove in the order indicated in the table.
4. Install in the reverse order of removal.
|
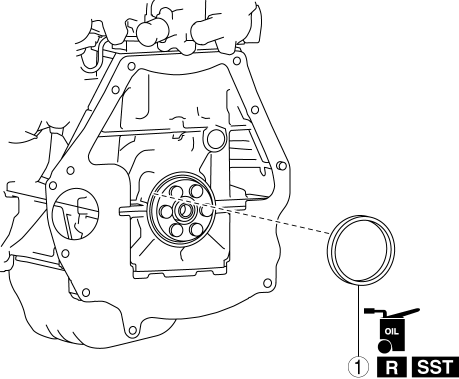
1 |
Rear oil seal (See Rear Oil Seal Removal Note.) (See Rear Oil Seal Installation Note.) |
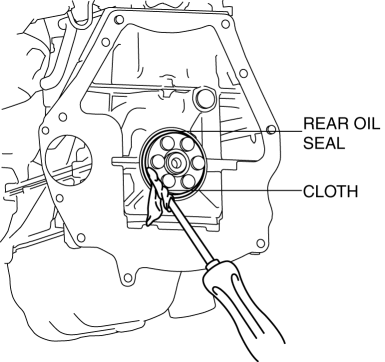
Rear Oil Seal Removal Note
1. Cut the oil seal lip using a utility knife.
2. Remove the oil seal using a flathead screwdriver with the tip protected by a clean cloth to prevent damage to the oil seal sliding part of the crankshaft.
Rear Oil Seal Installation Note
1. Apply clean engine oil to the inner surface of a new rear oil seal.
2. Insert the rear oil seal into the cylinder block by hand.
3. Tap the oil seal in evenly using the SST
and a hammer.
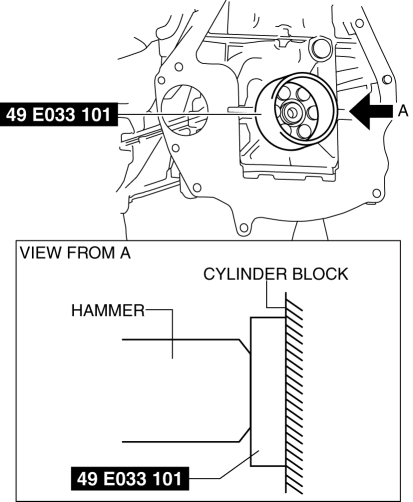

-
Rear oil seal press-in amount
-
0—0.5 mm {0—0.019 in}
 Oil Strainer
Purpose, Function
The oil strainer suctions the engine oil in the oil pan using the oil pump
vacuum. The engine oil is filtered by the internal filter at that time.
Construction
...
 Oil Pressure Switch Inspection
1. Switch the ignition ON (engine off) and verify that the oil pressure warning
light is illuminated.
2. Start the engine and verify that the oil pressure warning light turns off.
If the ...
Other materials:
Fuel Gauge Sender Unit Removal/Installation [Awd]
WARNING:
Always keep sparks and flames away from fuel when servicing the fuel system.
Fuel can be easily ignited which could cause serious injury or death, and damage
to equipment.
Fuel line spills and leakage from the pressurized fuel system are dangerous.
Fuel can ignite a ...
High Clutch [Fw6 A EL, Fw6 Ax EL]
Purpose/Function
The high clutch operates in 4GR, 5GR, and 6GR and intermittently operates
the rear carrier by drive force from the turbine shaft.
For the high clutch, a centrifugal balance clutch has been adopted to prevent
clutch drag and to assure stabilized piston thrust in ...
Brake System/ABS Warning Light
Purpose/Function
The brake system/ABS warning light is built into the instrument cluster.
If a malfunction is detected in the system with the parking brake released,
the warning light illuminates to notify the driver.
Construction/Operation
When the DSC system and CAN l ...
