
Mazda CX-5 Service & Repair Manual: Rear Body Control Module (Rbcm) Removal/Installation
CAUTION:
-
If configuration is not performed when the rear body control module (RBCM) is replaced with a new one, the vehicle specification information is not stored in the rear body control module (RBCM) and the system will not operate normally.
-
When performing configuration, it is necessary to read the vehicle specification information from the rear body control module (RBCM) before replacing it. Connect the M-MDS to the vehicle and perform vehicle identification before removing the rear body control module (RBCM). The vehicle specification information is temporarily stored in the M-MDS.
NOTE:
-
The rear body control module (RBCM) prior to replacement stores the vehicle specification information.
-
A new rear body control module (RBCM) does not store any vehicle specification information.
-
If the vehicle specification information from the rear body control module (RBCM) prior to replacement cannot be read, perform the configuration using As-Built data.
1. When replacing the rear body control module (RBCM), perform the configuration..
2. Disconnect the negative battery cable..
3. Remove the following parts:
-
Trunk board.
-
Trunk end trim.
-
Rear scuff plate (LH).
-
Trunk side trim (LH).
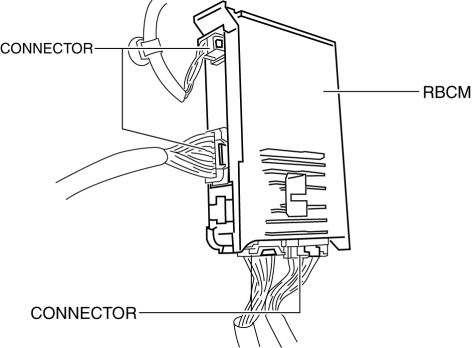
4. Disconnect the connectors shown in the figure.
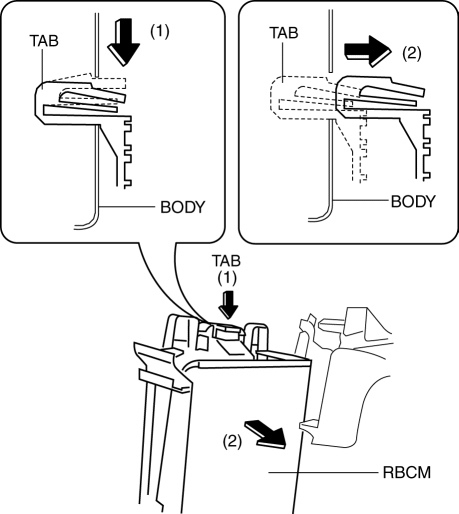
5. While pressing the rear body control module (RBCM) tab in the direction of arrow (1) shown in the figure, pull it in the direction of arrow (2) to detach the tab from the body.
6. Pull the rear body control module (RBCM) up in the direction of the arrow to detach the hook from the body.
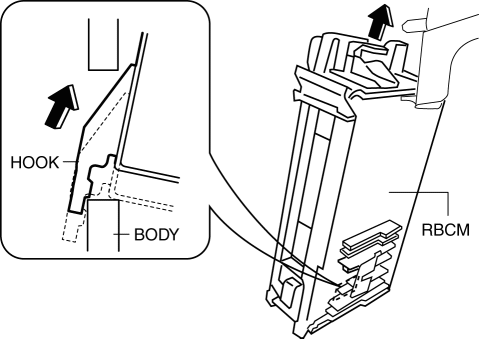
7. Remove the rear body control module (RBCM).
8. Insert a tape-wrapped flathead screwdriver into the position shown in the figure.
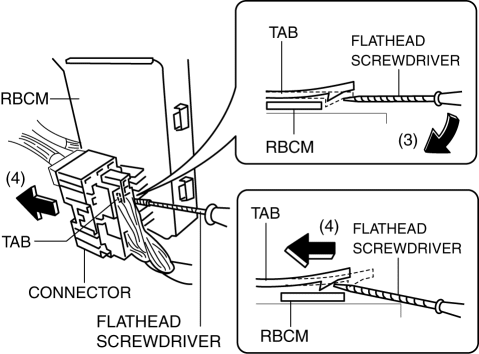
9. Move the screwdriver in the direction of arrow (3) shown in the figure and pull the connector in the direction of arrow (4) to detach its tab from the rear body control module (RBCM).
10. Pull the connector in the direction of arrow (4) shown in the figure and remove it.
11. Install in the reverse order of removal.
NOTE:
-
If configuration cannot be performed by reading/writing of the vehicle specification information, perform the configuration using As-Built information after replacing the rear body control module (RBCM)..
 Rear Body Control Module (Rbcm) Inspection
1. Disconnect the negative battery cable..
2. Remove the following parts:
a. Trunk board.
b. Trunk end trim.
c. Rear scuff plate (LH).
d. Trunk side trim (LH).
3. Remove the rear body cont ...

Other materials:
Interior Lighting System
Outline
A room light control system has been adopted in which illumination time and
illumination level of the interior lights change.
The rear body control module (RBCM) performs room light control system fail-safe..
Structural View
System Wiring Diagram
...
Rear Upper Arm Removal/Installation [Awd]
WARNING:
Verify that the crossmember is securely supported by a jack. If the rear
crossmember falls off, it can cause serious injury or death, and damage to the
vehicle.
CAUTION:
Performing the following procedures without first removing the rear ABS wheel-speed
sensor ...
Awd Control Module Configuration
CAUTION:
When performing configuration, it is necessary to read the coupling component
calibration data from the AWD control module before replacing it. Connect the
M-MDS to the vehicle and perform vehicle identification before removing the
AWD control module. The coupling component ...
