Mazda CX-5 Service & Repair Manual: Torque Converter [Fw6 A EL, Fw6 Ax EL]
Purpose/Function
-
By use of an optimized torus shape (wing) matching the output characteristics of the engine, the torque converter achieves efficient force transmission and reduced fuel consumption.
Construction/Operation
-
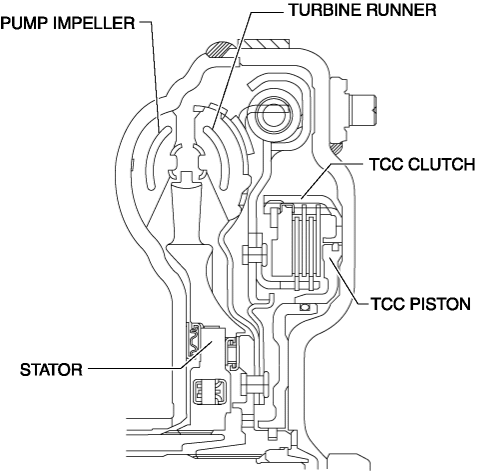
A three-member, single-stage two-phase type torque converter with a torque converter clutch (TCC) mechanism has been adopted.
-
Three-member: Indicates that the torque converter consists of a pump impeller, turbine runner, and stator.
-
Single stage: Indicates the number of turbine runners.
-
Two-phase: Indicates that there are two conditions; torque converter range and fluid coupling range.
TCC mechanism
-
A TCC piston built into the torque converter operates during TCC control. When hydraulic pressure is applied to the TCC piston, the TCC clutch engages to mechanically connect the pump impeller to the turbine runner. The TCC mechanism achieves excellent fuel economy as a result of no loss in drive force transmission due to torque converter slippage. In addition, precise hydraulic control is made possible by a multi-plate clutch equipped with an independent piston housing. With the adoption of this mechanism, the achievable range of TCC control has widened dramatically.
 Torque Converter Clutch (TCC) Control [Fw6 A EL, Fw6 Ax EL]
Outline
For TCC control, a newly developed, full range TCC control has been adopted.
The TCC range has been significantly widened by having the smoothness unique
to the torque converter d ...
 Transmission/Transaxle Abbreviations
AAS
Active Adaptive Shift
ABS
Antilock Brake System
ABDC
After Bottom Dead Center
ACC
Access ...
Other materials:
Passenger Compartment Temperature Sensor Removal/Installation [Full Auto Air
Conditioner]
1. Disconnect the negative battery cable..
2. Remove the following parts:
a. Front scuff plate (driver-side).
b. Front side trim (driver-side).
c. Switch panel.
d. Decoration panel.
e. Shift lever knob (MTX).
f. Front console box.
g. Shift panel.
h. Upper panel.
i. Rear console. ...
Cylinder Head Gasket Replacement
WARNING:
A hot engine can cause severe burns. Turn off the engine and wait until it
is cool before servicing.
Fuel vapor is hazardous. It can very easily ignite, causing serious injury
and damage. Always keep sparks and flames away from fuel.
Fuel line spills and leakag ...
Bluetooth®
Bluetooth® Hands-Free
When a Bluetooth® device (mobile phone) is connected to the vehicle's Hands-Free
unit via radio wave transmission, a call can be made or received by pressing the
talk button, pick-up button, hang-up button, or voice command on the steering wheel,
or by operating t ...
