Mazda CX-5 Service & Repair Manual: Piston, Piston Ring, Piston Pin
Purpose, Function
Piston
-
The piston in the cylinder of the cylinder block moves reciprocally by the pressure received when the air-fuel mixture combusts.
Piston ring
-
The piston ring consists of the compression ring (top ring, second ring) and the oil ring, and has the following function.
-
The compression ring prevents leakage of pressure in the cylinder from the piston circumference.
-
The oil ring clears off extra engine oil adhered to the cylinder wall.
-
The piston ring transmits piston heat to the cylinder wall to cool the piston.
Piston pin
-
The reciprocating movement of the piston is transmitted to the connecting rod by the connection of the piston pin to connecting rod.
Construction
Piston
-
The high-temperature strength piston is made of aluminum alloy with excellent thermal conductivity.
-
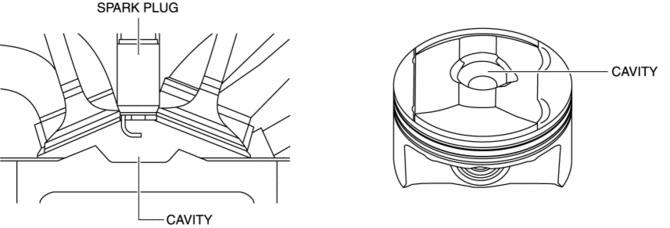
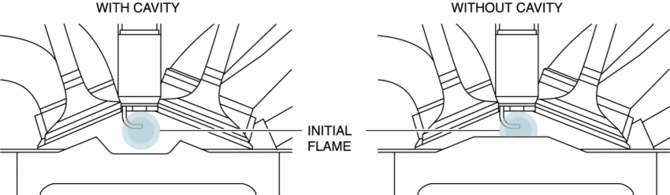
The piston has a cavity on the top surface. As a result, the initial combustion flame is prevented from hitting the top surface of the piston to reduce cooling loss.
-
The sliding resistance has been reduced by optimizing the piston skirt shape.
-
A weight reduction is realized by optimizing the piston shape.
-
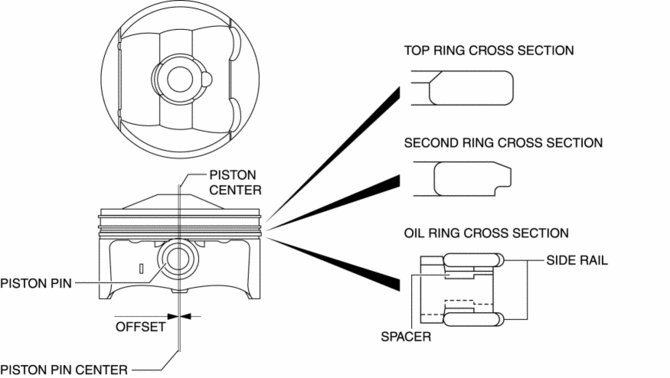
With the adoption of the offset piston, piston slap is suppressed.
Piston ring
-
A barrel-face ring for the top ring and a taper under cut ring for the second ring have been adopted.
-
A three-piece oil ring consisting of a side rail and spacer have been adopted for the oil ring.
-
Tracking capability to the cylinder wall has been improved by thinning down the piston ring. As a result, a low-tension piston ring has been implemented without increasing the engine oil consumption, and the sliding resistance has been reduced during reciprocating movement.
Piston pin
-
The piston is a full-floating type.
 Connecting Rod, Connecting Rod Bearing
Purpose, Function
Connecting rod
The connecting rod transmits the reciprocating movement of the piston to
the crankshaft by engaging the piston pin and crank pin.
Connecting rod beari ...

Other materials:
Steering Column And Shaft
Purpose/Function
The steering input force, generated when the driver operates the steering
wheel, is transmitted to the steering gear.
Construction
The steering column and shaft consists of the steering column with a built-in
EPS mechanism and the intermediate shaft.
...
Seat Weight Sensor Control Module Removal/Installation [Two Step Deployment
Control System]
CAUTION:
When the seat weight sensor control module is replaced with a new one, perform
the seat weight sensor calibration using the M?MDS..
1. Switch the ignition to off.
2. Disconnect the negative battery cable and wait for 1 min or more..
3. Disconnect the connectors.
...
Front Seat Belt Pretensioner and Load Limiting Systems
For optimum protection, the driver and front passenger seat belts are equipped
with pretensioner and load limiting systems. For both these systems to work properly
you must wear the seat belt properly.
Pretensioners:
In moderate or severe frontal or nearfrontal accidents, the front air bag and ...
