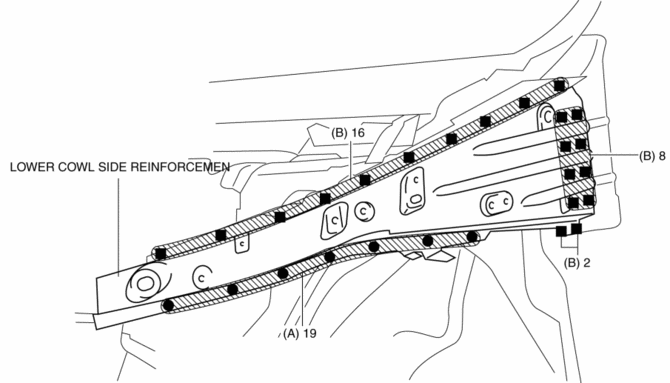
Mazda CX-5 Service & Repair Manual: Lower Cowl Side Reinforcement Installation [Panel Replacement]
Symbol Mark

Installation Procedure
1. When installing new parts, measure and adjust the body as necessary to conform with standard dimensions.
2. Drill holes for the plug welding before installing the new parts.
3. After temporarily installing new parts, make sure the related parts fit properly.
4. Spot weld the 19 locations indicated by (A) shown in the figure.
5. Plug weld the 26 locations indicated by (B) shown in the figure, then install the lower cowl side reinforcement.
 Front Under Cover No.2 Removal/Installation
1. Lift up the vehicle.
2. Remove the front under cover No.1..
3. Remove bolts A.
4. Remove fasteners B.
5. Remove the front under cover No.2.
6. Install in the reverse order of removal. ...
 Lower Cowl Side Reinforcement Removal [Panel Replacement]
Symbol Mark
Removal Procedure
1. Drill the 41 locations shown in the figure.
2. Remove the lower cowl side reinforcement. ...
Other materials:
Receiver/Drier Removal/Installation
1. Disconnect the negative battery cable..
2. Discharge the refrigerant..
3. Remove the front under cover No.1..
4. Drain the engine coolant..
5. Remove the following parts:
a. Plug hole plate.
b. Air cleaner, air hose and fresh air duct component.
c. Coolant reserve tank.
d. Cooling ...
PCM Removal/Installation
CAUTION:
There are two types of PCM settings. If the incorrect PCM is installed, it
could cause interference with engine control.
When replacing the PCM, verify the first four digits of the part number indicated
on the PCM label before replacement, and replace the PCM with one ...
Air Cleaner Element Inspection
1. Remove the air cleaner element..
2. Inspect the following items:
Has the replacement interval past?
Is the air cleaner element soiled, damaged, or bent?
Are the air cleaner case and the air cleaner element correctly sealed?
Is the correct air cleaner element inst ...
