Mazda CX-5 Service & Repair Manual: Lower Cowl Side Reinforcement Removal [Panel Replacement]
Symbol Mark

Removal Procedure
1. Drill the 41 locations shown in the figure.
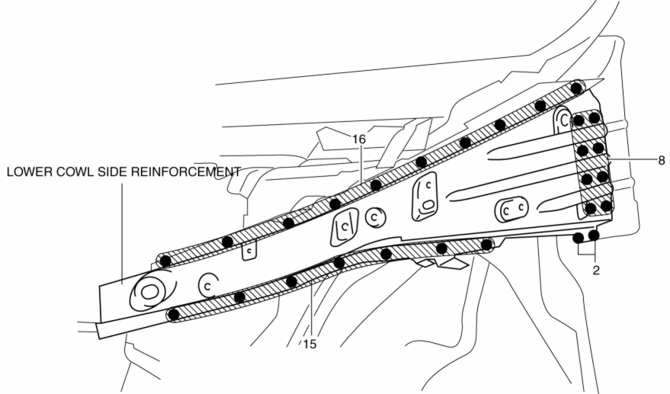
2. Remove the lower cowl side reinforcement.
 Lower Cowl Side Reinforcement Installation [Panel Replacement]
Symbol Mark
Installation Procedure
1. When installing new parts, measure and adjust the body as necessary to conform
with standard dimensions.
2. Drill holes for the plug welding before inst ...
 Mudguard Removal/Installation
1. Remove the front over fender..
2. Remove screws A.
3. Remove fasteners B.
4. Pull the mudguard in the direction of the arrow shown in the figure.
5. Install in the reverse order of ...
Other materials:
Rear Seat Back Removal/Installation
CAUTION:
When removing or putting in the rear seat, contact with the surrounding areas
of the vehicle could cause scratches and damage. When removing or putting in
the rear seat, always use two or more persons to perform the work and be careful
not to scratch or damage the rear seat ...
Air Fuel Ratio (A/F) Sensor Inspection
A/F Sensor Inspection
1. Connect the M-MDS to the DLC?2.
2. Switch the ignition ON (engine on).
3. Warm up the engine to normal operating temperature.
4. Access the following PIDs using the M-MDS..
VSS (Vehicle speed)
RPM (Engine speed)
O2S11 (A/F sensor output current ...
Master Cylinder Removal/Installation
1. Remove the battery..
2. Remove in the order indicated in the table.
3. Install in the reverse order of removal.
4. After installation, add brake fluid, bleed the air, and inspect for fluid
leakage..
1
Brake fluid level sensor connector
2
...
