Mazda CX-5 Service & Repair Manual: Front Under Cover No.2 Removal/Installation
1. Lift up the vehicle.
2. Remove the front under cover No.1..
3. Remove bolts A.
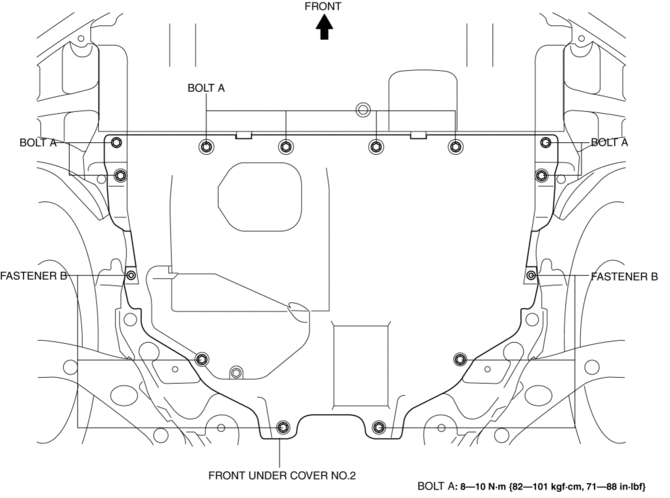
4. Remove fasteners B.
5. Remove the front under cover No.2.
6. Install in the reverse order of removal.
 Front Under Cover No.1 Removal/Installation
1. Remove bolts A.
2. Remove screws B.
3. Remove fasteners C.
4. Remove the front under cover No.1 in the direction of the arrow in the order
of (1), (2) shown in the figure while detachin ...
 Lower Cowl Side Reinforcement Installation [Panel Replacement]
Symbol Mark
Installation Procedure
1. When installing new parts, measure and adjust the body as necessary to conform
with standard dimensions.
2. Drill holes for the plug welding before inst ...
Other materials:
Supplier Identification Procedure [Audio]
NOTE:
The unit supplier can vary. When asking the supplier (service center) for
repair or replacement, identify the supplier and fill in the Audio Repair Order
Form using the following procedures.
Verification procedure using label or inscribed lettering
1. Disconnect the negati ...
Drive Belt Removal/Installation [Skyactiv G 2.0]
WARNING:
A hot engine can cause severe burns. Turn off the engine and wait until it
is cool before servicing.
NOTE:
Remove/install the drive belt from the underside of the vehicle.
Generator Drive Belt Removal/Installation
CAUTION:
To prevent damage to the dri ...
Air Mix Actuator Removal/Installation [Full Auto Air Conditioner]
Driver-side
1. Disconnect the negative battery cable..
2. Remove the following parts:
a. Side wall (driver-side).
b. Front heat duct (LH).
3. Disconnect the air mix actuator connector.
4. Remove the screw.
5. Remove the driver-side air mix actuator.
6. Install in the reverse order ...
