Mazda CX-5 Service & Repair Manual: Antenna Feeder No.2 Removal/Installation
Removal
1. Disconnect the negative battery cable..
2. Remove the following parts:
a. Sunroof seaming welt (with sunroof system).
b. A-pillar trim.
c. Front map light.
d. Sunvisor.
e. Front scuff plate.
f. Rear scuff plate.
g. B-pillar lower trim.
h. Adjust anchor cover.
i. Upper anchor installation bolt on the seat belt.
j. B-pillar upper trim.
k. Assist handle.
l. Trunk board.
m. Trunk end trim.
n. Trunk side trim.
o. D-pillar trim.
p. C-pillar trim.
q. Headliner.
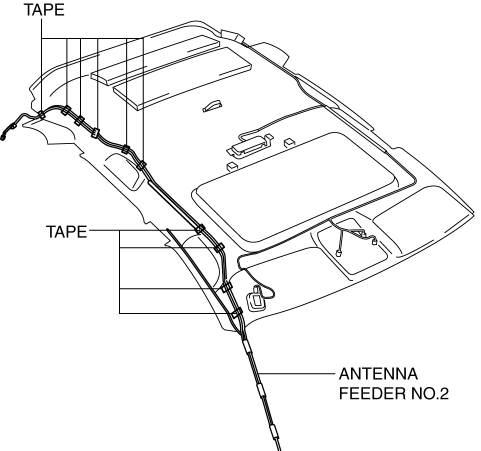
3. Peel off the tape shown in the figure and remove antenna feeder No.2.
Without sunroof
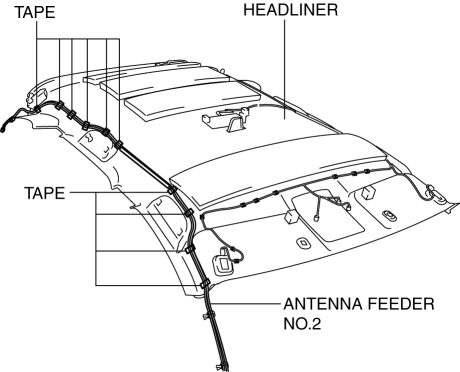
With sunroof
Installation
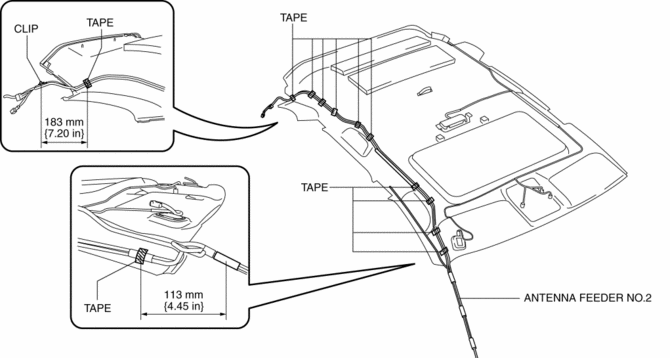
1. Affix tape shown in the figure and install antenna feeder No.2.
Without sunroof
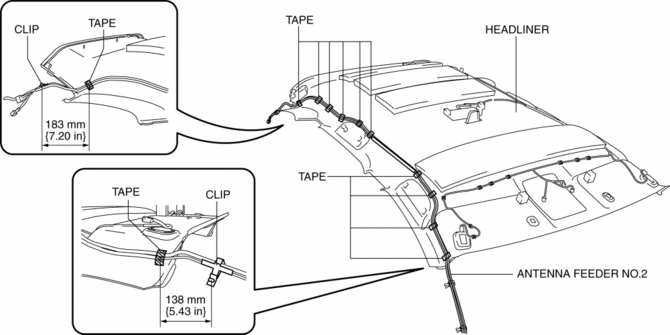
With sunroof
2. Install the following parts:
a. C-pillar trim.
b. D-pillar trim.
c. Trunk side trim.
d. Trunk end trim.
e. Trunk board.
f. Assist handle.
g. B-pillar upper trim.
h. Upper anchor installation bolt on the seat belt.
i. Adjust anchor cover.
j. B-pillar lower trim.
k. Rear scuff plate.
l. Front scuff plate.
m. Sunvisor.
n. Front map light.
o. A-pillar trim.
p. Sunroof seaming welt (with sunroof system).
3. Connect the negative battery cable..
 Antenna Feeder No.2 Inspection
1. Disconnect the negative battery cable..
2. Remove the following parts:
a. A-pillar trim (RH).
b. Trunk board.
c. Trunk end trim (RH).
d. Rear scuff plate (RH).
e. Trunk side trim (RH). ...
 Antenna Feeder No.3 Inspection
1. Disconnect the negative battery cable..
2. Remove the following parts:
a. Front scuff plate.
b. Rear scuff plate.
c. B-pillar lower trim.
d. Front seat belt adjusting cover.
e. Front se ...
Other materials:
Coolant Reserve Tank Removal/Installation
1. Remove in the order indicated in the table.
2. Install in the reverse order of removal.
1
Wiring harness
2
Hose
3
Coolant reserve tank
(See Coolant Reserve Tank Removal Note.)
Coolant Reserve Ta ...
Discharge Headlight Service Warnings
Discharge Headlight Service Warnings
When replacing a discharge headlight bulb, performing the servicing with
the negative battery cable connected or in a wet work area could result in electrocution.
When replacing a discharge headlight bulb, perform the servicing under the following
...
Pressure Control Valve Inspection [Skyactiv G 2.0]
1. Remove the pressure control valve assembly..
CAUTION:
Do not apply a pressure 36 kPa {0.37 kgf/cm2, 5.2 psi} or more. Doing so
will damage the pressure control valve and evaporative hose.
2. Apply a pressure of 36 kPa {0.37 kgf/cm2, 5.2 psi} to port A.
3. Verify that ther ...
