Mazda CX-5 Service & Repair Manual: Keyless Antenna Removal/Installation
With Advanced Keyless Entry System
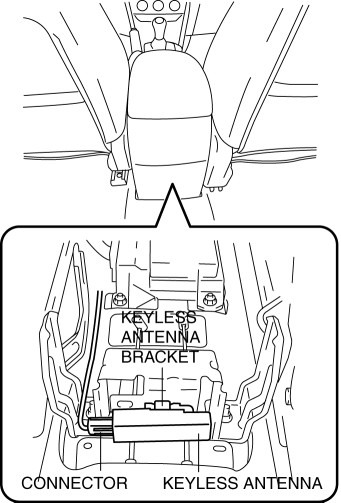
Vehicle interior, front
1. Disconnect the negative battery cable..
2. Remove the following parts:
a. Decoration panel.
b. Shift lever knob (MTX).
c. Front console box.
d. Shift panel.
e. Upper panel.
f. Rear console.
g. Side wall.
h. Front console.
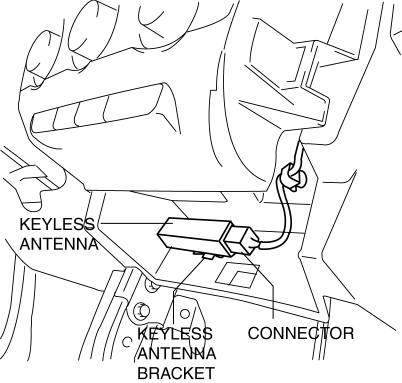
3. Disconnect the connector from the keyless antenna.
CAUTION:
-
Disconnect the connector while holding the keyless antenna, otherwise the keyless antenna bracket could be damaged.
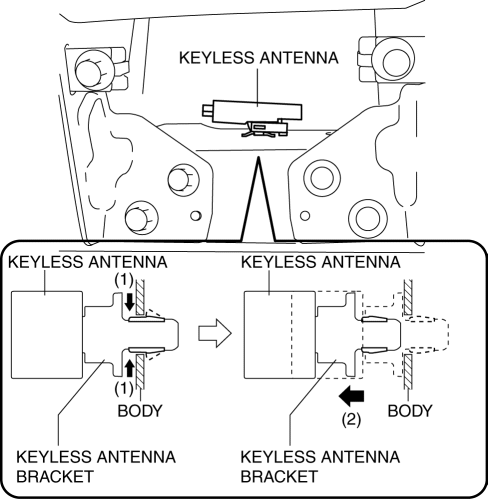
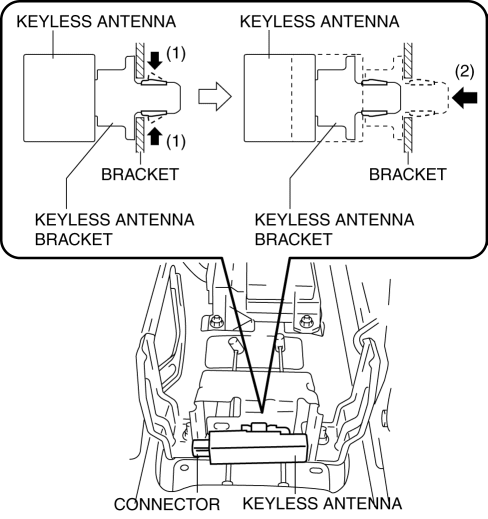
4. While pressing the keyless antenna bracket tab in the direction of arrow (1) shown in the figure, press it in the direction of arrow (2) to detach the keyless antenna bracket tab from the instrument panel.
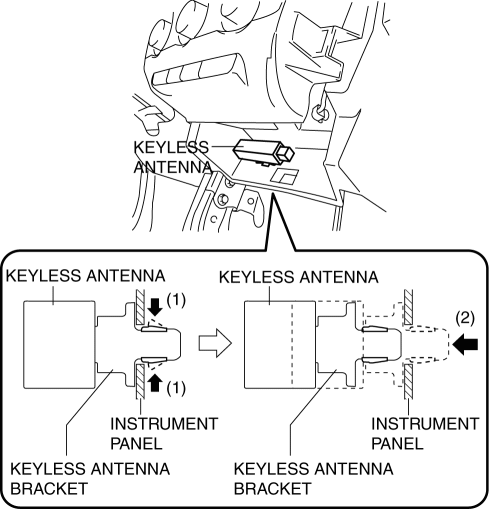
5. Remove the keyless antenna from the instrument panel.
6. Insert a tape-wrapped flathead screwdriver into the position shown in the figure.
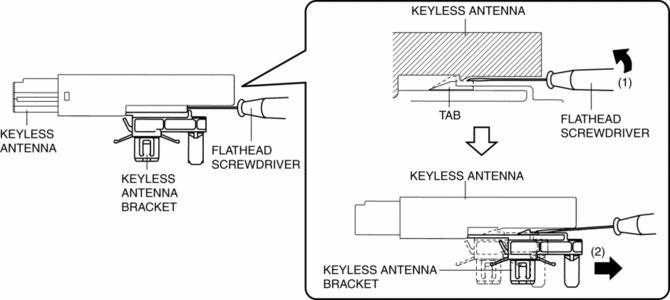
7. Move the tape-wrapped flathead screwdriver in the direction of arrow (1) shown in the figure to press the keyless antenna bracket tab, and pull it in the direction of arrow (2) to detach the keyless antenna bracket from the keyless antenna.
8. Remove the keyless antenna bracket from the keyless antenna.
9. Install in the reverse order of removal.
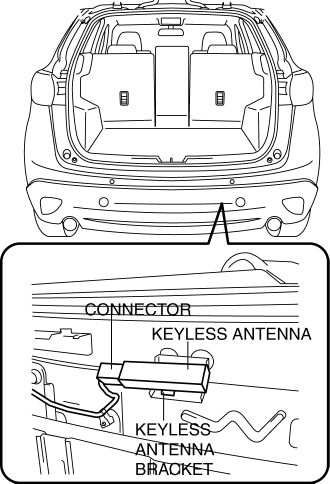
Vehicle interior, rear
1. Disconnect the negative battery cable..
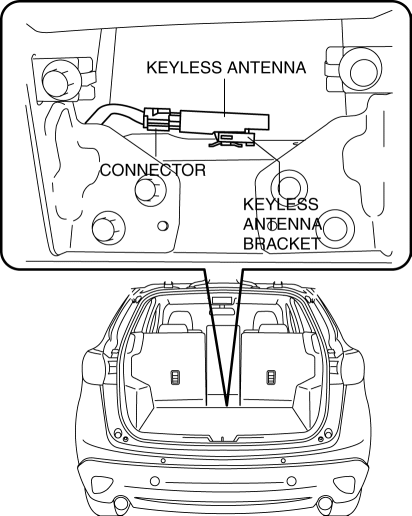
2. Remove the trunk board..
3. Disconnect the connector from the keyless antenna.
CAUTION:
-
Disconnect the connector while holding the keyless antenna, otherwise the keyless antenna bracket could be damaged.
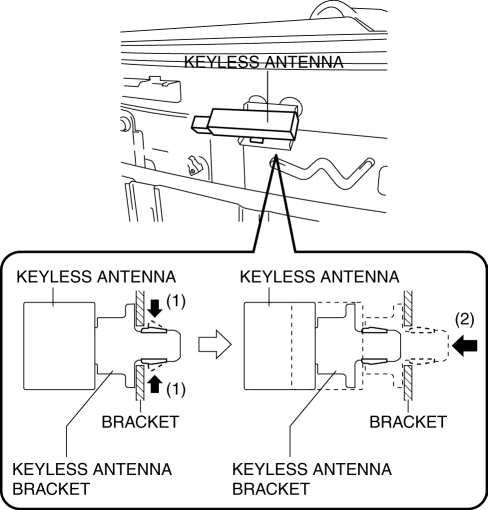
4. While pressing the keyless antenna bracket tab in the direction of arrow (1) shown in the figure, press it in the direction of arrow (2) to detach the keyless antenna bracket tab from the body.
5. Remove the keyless antenna from the body.
6. Insert a tape-wrapped flathead screwdriver into the position shown in the figure.
7. Move the tape-wrapped flathead screwdriver in the direction of arrow (1) shown in the figure to press the keyless antenna bracket tab, and pull it in the direction of arrow (2) to detach the keyless antenna bracket from the keyless antenna.
8. Remove the keyless antenna bracket from the keyless antenna.
9. Install in the reverse order of removal.
Vehicle exterior, rear
1. Disconnect the negative battery cable..
2. Disconnect the connector from the keyless antenna.
CAUTION:
-
Disconnect the connector while holding the keyless antenna, otherwise the keyless antenna bracket could be damaged.
3. While pressing the keyless antenna bracket tab in the direction of arrow (1) shown in the figure, press it in the direction of arrow (2) to detach the keyless antenna bracket tab from the bracket.
4. Remove the keyless antenna from the bracket.
5. Insert a tape-wrapped flathead screwdriver into the position shown in the figure.
6. Move the tape-wrapped flathead screwdriver in the direction of arrow (1) shown in the figure to press the keyless antenna bracket tab, and pull it in the direction of arrow (2) to detach the keyless antenna bracket from the keyless antenna.
7. Remove the keyless antenna bracket from the keyless antenna.
8. Install in the reverse order of removal.
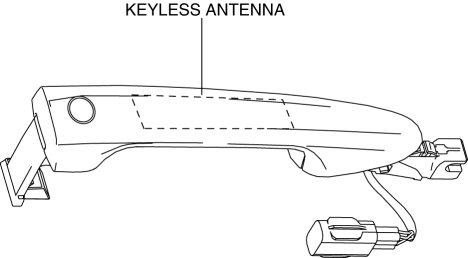
Vehicle exterior, driver's side/passenger's side
NOTE:
-
The keyless antenna (vehicle exterior, driver's side/passenger's side) cannot be removed as a single unit because it is built into the front outer handle. To replace the keyless antenna (vehicle exterior, driver's side/passenger's side), replace the front outer handle..
With Keyless Entry System
Vehicle interior, center
1. Disconnect the negative battery cable..
2. Remove the following parts:
a. Decoration panel.
b. Shift lever knob (MTX).
c. Front console box.
d. Shift panel.
e. Upper panel.
f. Rear console.
3. Disconnect the connector from the keyless antenna.
CAUTION:
-
Disconnect the connector while holding the keyless antenna, otherwise the keyless antenna bracket could be damaged.
4. While pressing the keyless antenna bracket tab in the direction of arrow (1) shown in the figure, press it in the direction of arrow (2) to detach the keyless antenna bracket tab from the bracket.
5. Remove the keyless antenna from the bracket.
6. Insert a tape-wrapped flathead screwdriver into the position shown in the figure.
7. Move the tape-wrapped flathead screwdriver in the direction of arrow (1) shown in the figure to press the keyless antenna bracket tab, and pull it in the direction of arrow (2) to detach the keyless antenna bracket from the keyless antenna.
8. Remove the keyless antenna bracket from the keyless antenna.
9. Install in the reverse order of removal.
 Installation Of Radio System
The control modules and control unit have been designed with sufficient attention
to radio wave disturbances from the outside. However, observe the following precautions
when installing the radio ...
 Keyless Antenna [Advanced Keyless Entry System]
Purpose
Outputs a request signal and specifies the remote transmitter location.
Function
The keyless antenna outputs request signals to the inside and outside of
the vehicle bas ...
Other materials:
Low Clutch [Fw6 A EL, Fw6 Ax EL]
Purpose/Function
The low clutch operates in 1GR, 2GR, 3GR and 4GR and intermittently operates
the sun gear by drive force from the turbine shaft.
For the low clutch, a centrifugal balance clutch has been adopted to prevent
clutch drag and to assure stabilized piston thrust in al ...
Front Seat Cushion Frame Removal/Installation
WARNING:
Handling a side air bag improperly can accidentally operate (deploy) the
air bag, which may seriously injure you. Read the service warnings/cautions
in the Workshop Manual before handling the front seat (side air bag integrated)..
If the sliding mechanisms on both side ...
Rear Lower Arm Removal/Installation
WARNING:
Be careful not to allow the coil spring to fly off when removing/installing
the coil spring. Otherwise, the coil spring could fly off and cause serious
injury or death, or damage to the vehicle.
1. When working on the left side of the vehicle, disconnect the auto lev ...
