Mazda CX-5 Service & Repair Manual: Installation Of Radio System
The control modules and control unit have been designed with sufficient attention to radio wave disturbances from the outside. However, observe the following precautions when installing the radio set to the vehicle to prevent adverse effects on the control modules and control unit.
-
Install the radio set and its antenna as far away as possible from the control modules and control unit.
-
The antenna feeder and power cable generate radio waves, therefore, keep them 100 mm {3.94 in} or more
from the control modules, control unit, and wiring harness. If the antenna feeder and power cable cross over the wiring harness, place them perpendicular to the wiring harness.
-
Do not install a high output radio set.
-
Do not use the control modules and control unit power source for the radio set. In addition, do not use the cigar lighter and accessory socket power source.
-
Do not attach the antenna feeder or wiring harness of the radio set to the wiring harness, fuel pipe, or brake tube of the vehicle.
-
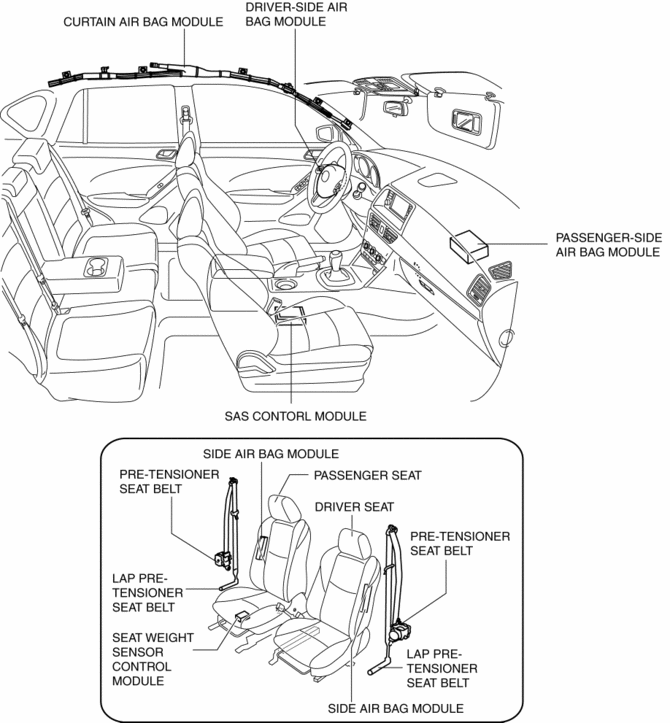
Do not install any radio set-related devices in the area where the air bag module deploys to prevent a secondary accident if the air bag were to deploy.
-
After installing the radio set, perform a test transmission with the engine idling to verify that it does not affect engine control.
 Glass Antenna Inspection
1. Disconnect the negative battery cable..
2. Partially peel back the seaming welt.
3. Remove the liftgate upper trim..
4. Disconnect antenna feeder No.3 connector..
5. Visually inspect the gl ...
 Keyless Antenna Removal/Installation
With Advanced Keyless Entry System
Vehicle interior, front
1. Disconnect the negative battery cable..
2. Remove the following parts:
a. Decoration panel.
b. Shift lever knob (MTX).
c. Front ...
Other materials:
Door Locks
WARNING
Always take all children and pets with you or leave a responsible person with
them:
Leaving a child or a pet unattended in a parked vehicle is dangerous. In hot
weather, temperatures inside a vehicle can become high enough to cause brain damage
or even death.
Do not leave the key in ...
Power Brake Unit Inspection
NOTE:
The following inspection methods are simple inspection methods to judge the
function of the power brake unit.
If there is any malfunction in the power brake unit, replace the power brake
unit as a single unit.
Without Using SST
Operation inspection
1. With the eng ...
Direct Fuel Injection System
Purpose, Outline
Engine output has been improved through the direct injection of fuel into
the combustion chamber.
High response can be because there is no time lag from when the fuel injection
starts until the fuel is provided to the combustion chamber.
Structure
...
