Mazda CX-5 Service & Repair Manual: Front Body Control Module (Fbcm) Removal/Installation
CAUTION:
-
If configuration is not performed when the front body control module (FBCM) is replaced with a new one, the vehicle specification information is not stored in the front body control module (FBCM) and the system will not operate normally.
-
When performing configuration, it is necessary to read the vehicle specification information from the front body control module (FBCM) before replacing it. Connect the M-MDS to the vehicle and perform vehicle identification before removing the front body control module (FBCM). The vehicle specification information is temporarily stored in the M-MDS.
NOTE:
-
The front body control module (FBCM) prior to replacement stores the vehicle specification information.
-
A new front body control module (FBCM) does not store any vehicle specification information.
-
If the vehicle specification information from the front body control module (FBCM) prior to replacement cannot be read, perform the configuration using As-Built data.
1. When replacing the front body control module (FBCM), perform the configuration..
2. Disconnect the negative battery cable..
3. Remove the fuse box cover..
4. Insert a tape-wrapped flathead screwdriver into the position shown in the figure.
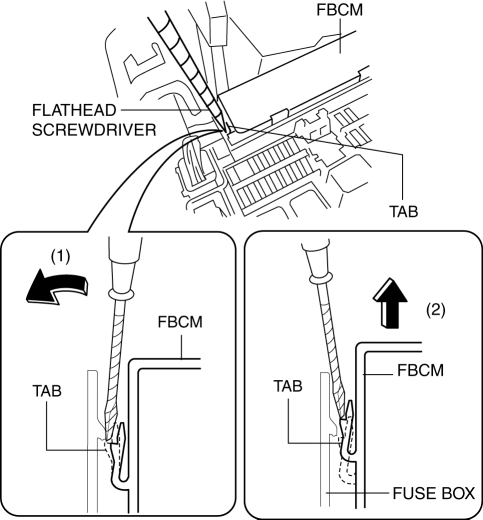
5. Move the screwdriver in the direction of arrow (1) shown in the figure and lift the front body control module (FBCM) in the direction of arrow (2) to detach its tab from the fuse box.
6. Insert a tape-wrapped flathead screwdriver into the position shown in the figure.
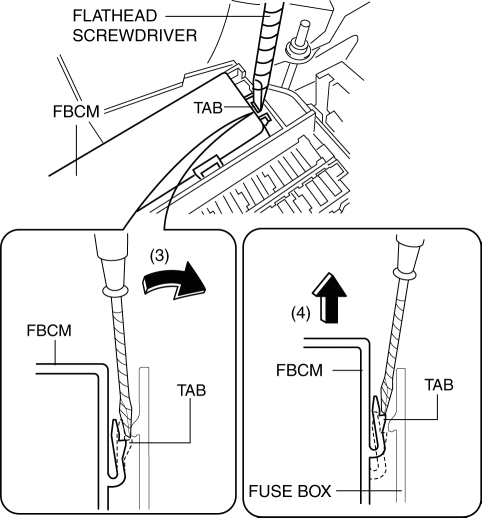
7. Move the screwdriver in the direction of arrow (3) shown in the figure and lift the front body control module (FBCM) in the direction of arrow (4) to detach its tab from the fuse box.
8. Pull the front body control module (FBCM) in the direction of the arrow shown in the figure to remove it from the fuse box.

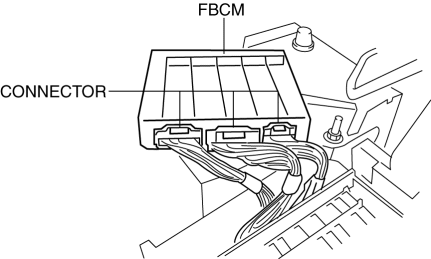
9. Disconnect the connectors shown in the figure.
10. Install in the reverse order of removal.
NOTE:
-
If configuration cannot be performed by reading/writing of the vehicle specification information, perform the configuration using As-Built information after replacing the front body control module (FBCM)..
 Front Body Control Module (Fbcm) Inspection
1. Remove the fuse box cover..
2. Remove the front body control module (FBCM) from the fuse box..
3. Verify that the voltages of each of the terminals are as indicated in the
Terminal Voltage Ta ...
 Main Relay Control [Skyactiv G 2.0]
Outline
Supplies power to each part by switching the main relay on/off at the optimal
timing according to the vehicle conditions.
Block Diagram
Operation
When the ignition ...
Other materials:
Rear Combination Light Removal/Installation
NOTE:
Fogging or condensation on the inside of the rear combination lights may
occur due to a natural phenomenon occurring as a result of a temperature difference
between the interior and exterior of the combination lights. However, it has
no effect on the light performance because ...
How to Use This Manual
We want to help you get the most driving pleasure from your vehicle. Your owner's
manual, when read from cover to cover, can do that in many ways.
Illustrations complement the words of the manual to best explain how to enjoy
your Mazda. By reading your manual, you can find out about the fea ...
Down Switch [Fw6 A EL, Fw6 Ax EL]
Purpose/Function
The down switch detects the shift down operation of the selector lever.
The down switch signal is sent to the TCM via CAN and is used for manual
shift control and engine-transaxle integration control.
Construction
The down switch is installed to the se ...
