Mazda CX-5 Service & Repair Manual: Cooling System Cap Inspection
WARNING:
-
Never remove the cooling system cap or loosen the radiator drain plug while the engine is running, or when the engine and radiator are hot. Scalding engine coolant and steam may shoot out and cause serious injury. It may also damage the engine and cooling system.
-
Turn off the engine and wait until it is cool. Even then, be very careful when removing the cap. Wrap a thick cloth around it and slowly turn it counterclockwise to the first stop. Step back while the pressure escapes.
-
When you are sure all the pressure is gone, press down on the cap using the cloth, turn it, and remove it.
1. Clean the cooling system cap and the sealed part.
2. Inspect the cooling system cap for cracks or everted seal.
-
If there is any malfunction, replace the cooling system cap.
3. Attach the cooling system cap to the radiator cap tester.
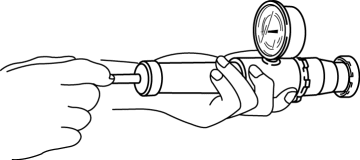
4. Hold the cooling system cap downward and apply pressure gradually. Verify that the pressure is held stable for 10 s.
-
If the pressure is not held stable, replace the cooling system cap.
-
Cooling system cap valve opening pressure
-
93.2—122.6 kPa {0.951—1.250 kgf/cm2, 13.6—17.7 psi}
 Cooling Fan Motor Removal/Installation
WARNING:
Never remove the cooling system cap or loosen the radiator drain plug while
the engine is running, or when the engine and radiator are hot. Scalding engine
coolant and steam may ...
 Cooling System Cap
Purpose, Function
The cooling system cap maintains appropriate pressure in the engine coolant
passage. In addition, cooling efficiency has been improved by increasing the
engine coolant b ...
Other materials:
Moonroof
The moonroof can be opened or closed electrically only when the ignition is switched
ON.
WARNING
Do not let passengers stand up or extend part of the body through the open moonroof
while the vehicle is moving:
Extending the head, arms, or other parts of the body through the moonroof is
da ...
M Position Switch [Fw6 A EL, Fw6 Ax EL]
Purpose/Function
The M position switch detects that the selector lever is in the M position.
The M position switch signal is sent to the TCM via CAN, and is used for
manual shift control and engine-transaxle integration control.
Construction
The M position switch is in ...
Oil Control Valve (OCV) [Skyactiv G 2.0]
Purpose, Function
The OCV switches the oil passage to the hydraulic variable valve timing actuator
to control the opening/closing period of the exhaust valve.
Construction
The OCV is installed to the exhaust camshaft cap (No.1).
The OCV consists of a spool valve wh ...
