Mazda CX-5 Service & Repair Manual: Clock Spring Inspection [Two Step Deployment Control System]
1. Disconnect the negative battery cable and wait for 1 min or more
..
2. Remove the driver?side air bag module..
3. Remove the steering wheel..
4. Remove the column cover..
5. Remove the clock spring..
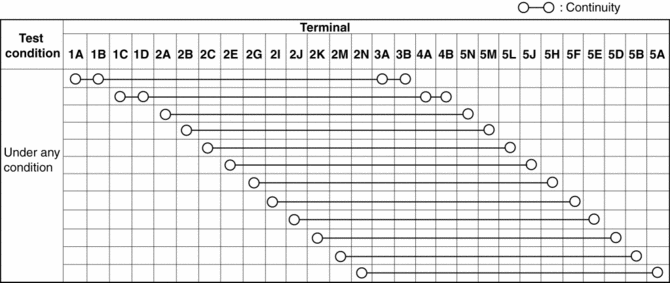
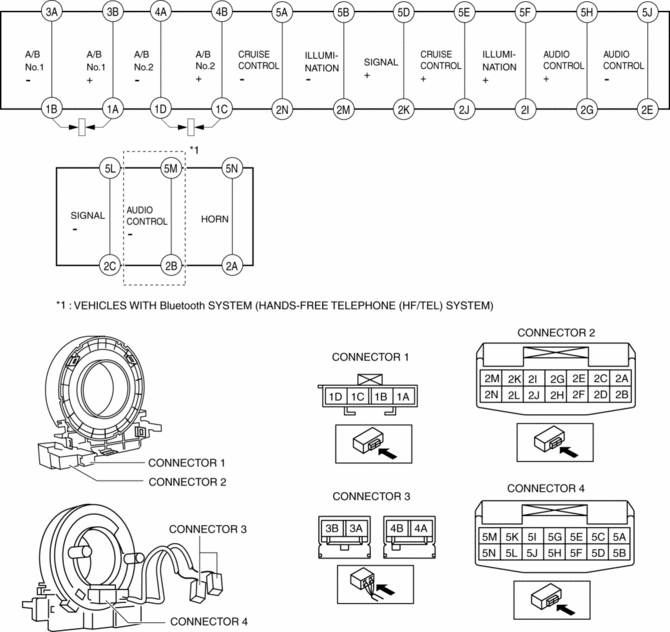
6. Verify that the continuity is as indicated in the table.
-
If not as indicated in the table, replace the clock spring.
NOTE:
-
When the vehicle-side connector for the clock spring is disconnected, terminals 1A, 1B, 1C and 1D are shorted to prevent unexpected operation (deployment) of the air bag module.
 Clock Spring Inspection [Standard Deployment Control System]
1. Disconnect the negative battery cable and wait for 1 min or more..
2. Remove the driver?side air bag module..
3. Remove the steering wheel..
4. Remove the column cover..
5. Remove the cloc ...
 Clock Spring Removal/Installation [Standard Deployment Control System]
CAUTION:
If the disc on the combination switch is deformed or has foreign material
adhering to it, performance of the steering angle sensor may be reduced, causing
abnormal operation. Wh ...
Other materials:
Low Fuel Warning Light
Purpose
The low fuel warning light warns the driver that the remaining fuel level
is low.
Function
The instrument cluster calculates the fuel quantity based on the following
CAN signals, and if a remaining fuel amount of approx. 10 L {2.6 US gal, 2.2
Imp gal} (fuel gauge ...
Not P Position Switch Inspection
NOTE:
The not P position switch is built into the selector lever component.
1. Disconnect the negative battery cable..
2. Remove the front console..
3. Disconnect the selector lever component connector.
4. Verify that the continuity between selector lever component terminals ...
Auto Leveling Sensor Inspection
1. Disconnect the negative battery cable..
2. Remove the auto leveling sensor..
3. Prepare three dry cell batteries (1.5 V).
4. Connect the three dry cell batteries in a series.
5. Connect the positive pole of the dry cell battery to auto leveling sensor
terminal C, and the negative po ...
