Mazda CX-5 Service & Repair Manual: Front Seat Rail Guide Cover Removal/Installation
WARNING:
-
Handling a side air bag improperly can accidentally operate (deploy) the air bag, which may seriously injure you. Read the service warnings/cautions in the Workshop Manual before handling the front seat (side air bag integrated)..
-
If the sliding mechanisms on both sides are not locked after assembling the front seat, the front seat will operate accidentally while the vehicle is driven, which could result in serious injury. After assembling the front seat, shake it up and down and verify that the sliding mechanism on the both sides are locked.
CAUTION:
-
If the slide bar is operated after the front seat is removed, the left/right slide positions will deviate and the adjuster unit could be damaged after the front seat is installed. After removing a front seat, do not operate the slider lever.
-
Verify that there are no malfunctions in the forward/back slide of the seat and in the adjuster unit after installing a front seat.
-
When performing the procedure with a front seat removed from the vehicle, perform the procedure on a clean cloth so as not to damage or soil the seat.
-
When the passenger's seat is removed, perform the seat weight sensor inspection using the M-MDS after installing the passenger's seat..
-
When the passenger's seat is replaced with a new one, perform the seat weight sensor calibration using the M-MDS..
NOTE:
-
When removing the front seat from the vehicle or putting it back in, it can be performed smoothly by removing the headrest.
1. Switch the ignition off (LOCK).
2. Disconnect the negative battery cable and wait for 1 min
..
3. Remove the following parts:
a. Front seat.
b. Front seat side cover.
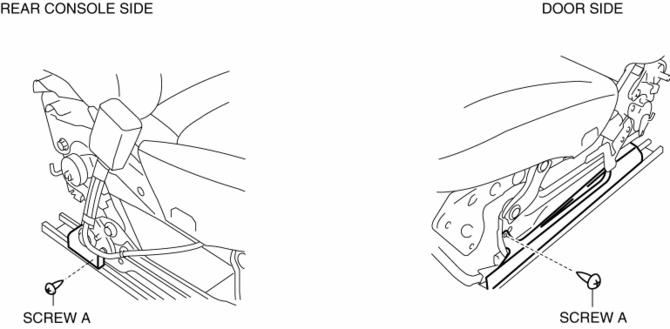
4. Remove screws A.

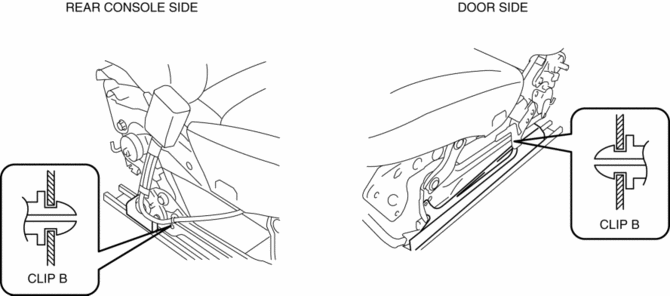
5. Detach clips B.

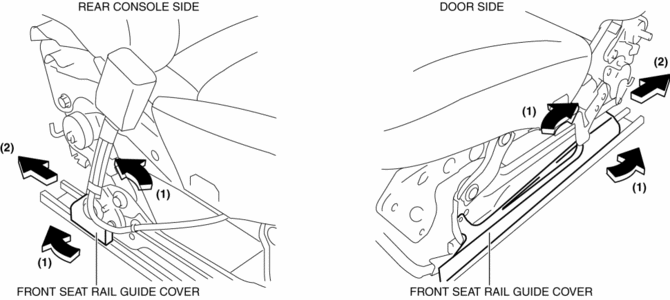
6. Pull the front seat rail guide cover in the direction of the arrow (1) shown in the figure and remove it in the direction of the arrow (2).

7. Install in the reverse order of removal.
 Front Seat Rail Cover Removal/Installation
1. Detach hook A while pulling the front seat rail cover in the direction of
the arrow (1) and remove it in the direction of arrow (2) shown in the figure.
2. Install in the reverse order of ...
 Front Seat Removal/Installation
WARNING:
Handling a side air bag improperly can accidentally operate (deploy) the
air bag, which may seriously injure you. Read the service warnings/cautions
in the Workshop Manual befor ...
Other materials:
Active Command Modes Inspection [Front Body Control Module (Fbcm)]
1. Connect the M-MDS to the DLC-2.
2. After the vehicle is identified, select the following items from the initialization
screen of the M-MDS.
a. Select “DataLogger”.
b. Select “Modules”.
c. Select “F_BCM”.
3. Select the active command modes from the PID table.
4. Perform t ...
Advanced Keyless Entry System
WARNING
Radio waves from the key may affect medical devices such as pacemakers: Before
using the key near people who use medical devices, ask the medical device manufacturer
or your physician if radio waves from the key will affect the device.
The advanced keyless function allows you to lock/u ...
Disc Pad (Rear) Replacement
1. Remove in the order indicated in the table.
2. Install in the reverse order of removal.
3. After installation, pump the brake pedal a few times and inspect the following:
The disc pad projection is securely installed to the piston groove
Parking brake lever stroke
Bra ...
