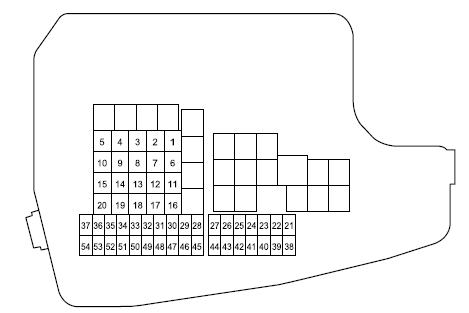
Mazda CX-5 Owners Manual: Fuses
Your vehicle's electrical system is protected by fuses.
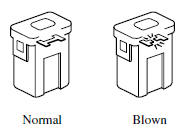
If any lights, accessories, or controls do not work, inspect the appropriate circuit protector. If a fuse has blown, the inside element will be melted.
If the same fuse blows again, avoid using that system and consult an Authorized Mazda Dealer as soon as possible.
Fuse Replacement
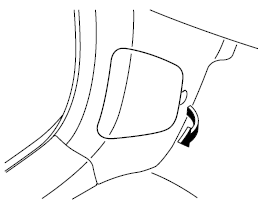
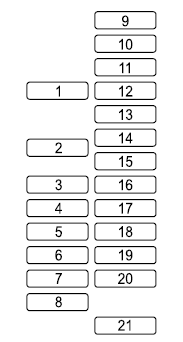
Replacing the fuses on the vehicle's left side
If the electrical system does not work, first inspect the fuses on the vehicle's left side.
1. Make sure the ignition is switched off, and other switches are off.
2. Open the fuse panel cover.
3. Pull the fuse straight out with the fuse puller provided on the fuse block located in the engine compartment.
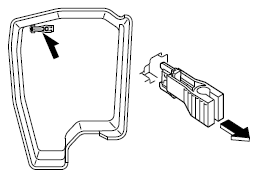
4. Inspect the fuse and replace it if it is blown.

5. Insert a new fuse of the same amperage rating, and make sure it fits tightly. If it does not fit tightly, have an expert install it. We recommend an Authorized Mazda Dealer.
If you have no spare fuses, borrow one of the same rating from a circuit not essential to vehicle operation, such as the AUDIO or OUTLET circuit.
CAUTION
Always replace a fuse with a genuine Mazda fuse or equivalent of the same rating. Otherwise you may damage the electric system.
6. Reinstall the cover and make sure that it is securely installed.
Replacing the fuses under the hood
If the headlights or other electrical components do not work and the fuses in the cabin are normal, inspect the fuse block under the hood. If a fuse is blown, it must be replaced. Follow these steps:
1. Make sure the ignition is switched off, and other switches are off.
2. Remove the fuse block cover.
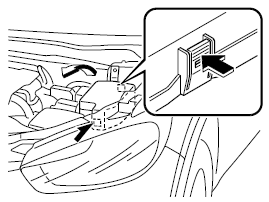
3. If any fuse but the MAIN fuse is blown, replace it with a new one of the same amperage rating.
WARNING
Do not replace the main fuse by yourself. Have an Authorized Mazda Dealer perform the replacement:
Replacing the fuse by yourself is dangerous because the MAIN fuse is a high current fuse. Incorrect replacement could cause an electrical shock or a short circuit resulting in a fire.
4. Reinstall the cover and make sure that it is securely installed.
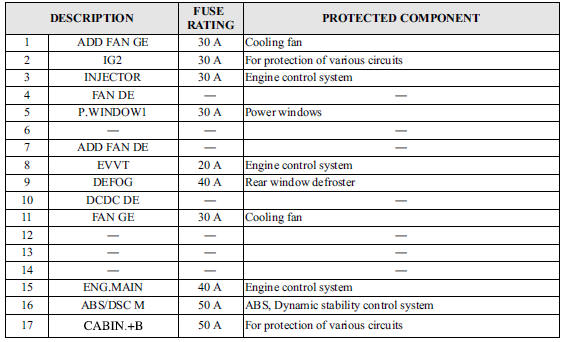
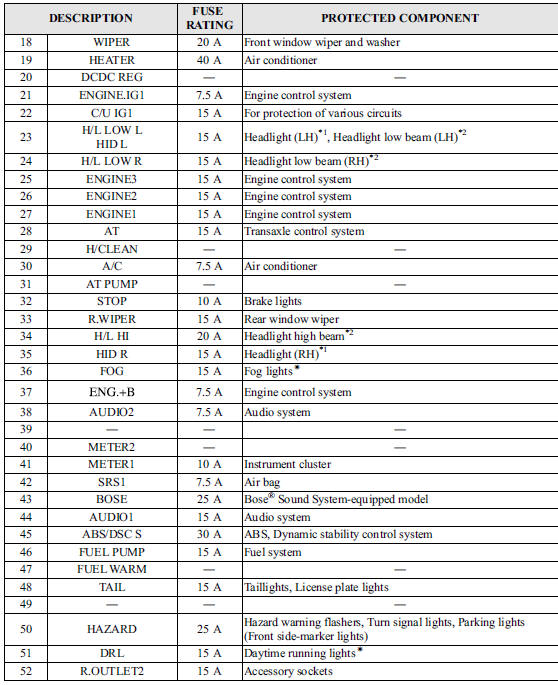
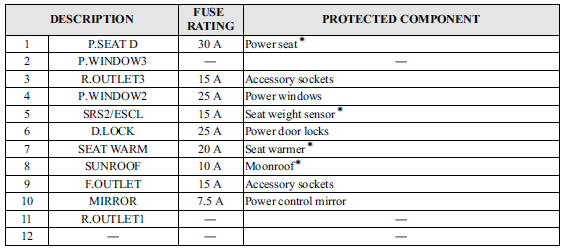
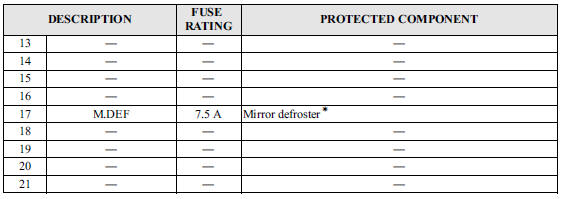
Fuse Panel Description
Fuse block (Engine compartment)

Fuse block (Left side)
 Light Bulbs
WARNING
Do not replace the xenon fusion bulbs yourself:
Replacing the xenon fusion bulbs yourself is dangerous. Because the xenon fusion
bulbs require high voltage, you could receive an electric ...
 Appearance Care
...
Other materials:
Push Button Start Inspection
1. Remove the push button start..
2. Verify that the continuity between the push button start terminals is as indicated
in the table.
If the continuity can be verified as indicated in the table, go to the next
step.
If not as indicated in the table, replace the push bu ...
Low And Reverse Brake [Fw6 A EL, Fw6 Ax EL]
Purpose/Function
The low and reverse brake stops the rotation of the front internal gear and
rear planetary carrier while in 1GR and in reverse, locking them to the transaxle
case.
Construction
The low and reverse brake consist of the following parts shown in the figure.
...
How To Use This Manual
Range of Topics
This manual contains procedures for performing all required service operations.
The procedures are divided into the following five basic operations:
Removal/Installation
Disassembly/Assembly
Replacement
Inspection
Adj ...
