Mazda CX-5 Service & Repair Manual: Clock Spring Inspection [Standard Deployment Control System]
1. Disconnect the negative battery cable and wait for 1 min or more
..
2. Remove the driver?side air bag module..
3. Remove the steering wheel..
4. Remove the column cover..
5. Remove the clock spring..
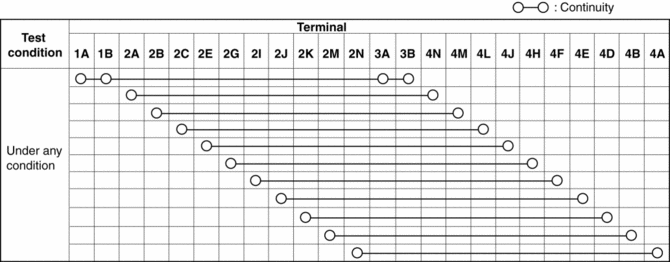
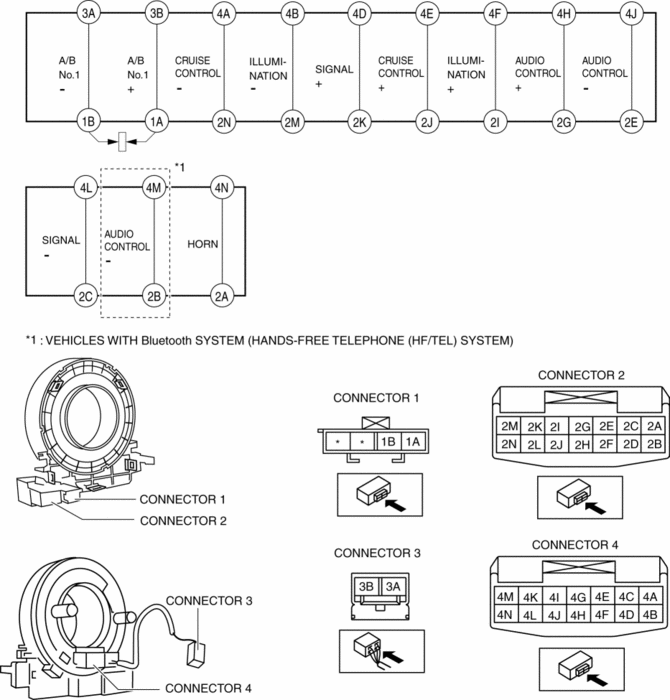
6. Verify that the continuity is as indicated in the table.
-
If not as indicated in the table, replace the clock spring.
NOTE:
-
When the vehicle-side connector for the clock spring is disconnected, terminals 1A and 1B are shorted to prevent unexpected operation (deployment) of the air bag module.
 Clock Spring Adjustment [Two Step Deployment Control System]
1. Set the front wheels straight ahead.
CAUTION:
The clock spring will break if over?wound. Do not forcibly turn the clock
spring.
2. Turn the clock spring clockwise until it stops. ...
 Clock Spring Inspection [Two Step Deployment Control System]
1. Disconnect the negative battery cable and wait for 1 min or more..
2. Remove the driver?side air bag module..
3. Remove the steering wheel..
4. Remove the column cover..
5. Remove the cloc ...
Other materials:
Passenger Compartment Temperature Sensor Removal/Installation [Full Auto Air
Conditioner]
1. Disconnect the negative battery cable..
2. Remove the following parts:
a. Front scuff plate (driver-side).
b. Front side trim (driver-side).
c. Switch panel.
d. Decoration panel.
e. Shift lever knob (MTX).
f. Front console box.
g. Shift panel.
h. Upper panel.
i. Rear console. ...
Auto Dimming Mirror Inspection
1. Measure the voltage at each terminal.
If the voltage is not as specified in the Terminal Voltage Table (Reference),
inspect the parts under “Inspection item (s)” and related wiring harnesses.
If the system does not work properly even though the inspection items
or ...
Power Outer Mirror Switch Inspection
1. Disconnect the negative battery cable..
2. Remove the power outer mirror switch..
3. Verify that the continuity between the power outer mirror switch terminals
is as indicated in the table.
If not as indicated in the table, replace the power outer mirror switch..
...
