Mazda CX-5 Service & Repair Manual: Center Roof Antenna Removal/Installation
1. Disconnect the negative battery cable..
2. Remove the following parts:
a. Front scuff plate.
b. Rear scuff plate.
c. B-pillar lower trim.
d. Front seat belt adjusting cover.
e. Front seat belt upper anchor installation bolt.
f. B-pillar upper trim.
g. Trunk board.
h. Trunk end trim.
i. Trunk side trim.
j. D-pillar trim.
k. C-pillar trim.
3. Remove the rear passenger's assist handle..
4. Partially peel back the headliner.
CAUTION:
-
Be careful not to peel back the headliner excessively. Otherwise it could create a fold-seam in the headliner.
5. Disconnect the connector.
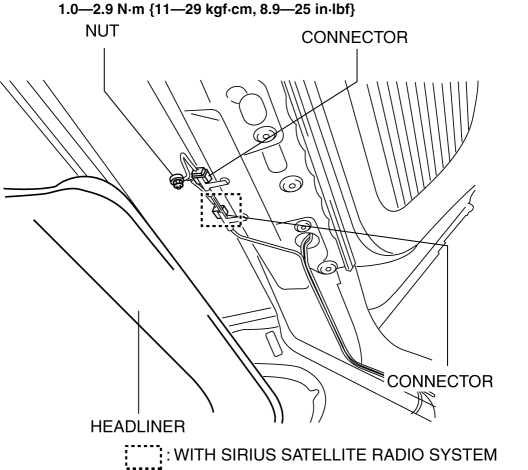
6. Remove the nut.
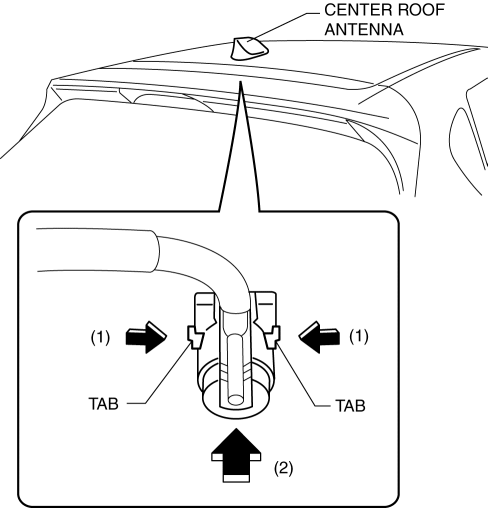
7. While pressing the center roof antenna tabs in the direction of arrows (1) shown in the figure, press the center roof antenna in the direction of arrow (2) to detach the center roof antenna tabs from the body.
8. Remove the center roof antenna.
9. Install in the reverse order of removal.
 Center Roof Antenna Inspection
NOTE:
The center roof antenna is integrated with the antenna amplifier.
Antenna amplifier inspection
1. Disconnect the negative battery cable..
2. Remove the following parts:
a. Fro ...
 Coil Antenna
Purpose
Sends the ID data programmed to the electronic transmission device (transponder)
in the remote transmitter to the start stop unit.
Function
A magnetic field occurs aroun ...
Other materials:
Engine Oil Control
Outline
The PCM reduces the oil pump load applied to the engine by controlling the
appropriate engine hydraulic pressure according to the engine operation conditions.
The engine hydraulic pressure switches in two steps. When hydraulic pressure
is not needed, the oil pump dischar ...
Front Combination Light Removal/Installation
WARNING:
Incorrect servicing of the discharge headlights could result in electrical
shock. Before servicing the discharge headlights, always refer to the service
warnings..
NOTE:
Fogging or condensation on the inside of the front combination lights may
occur due to a n ...
Starter Interlock Switch Inspection [Skyactiv G 2.0]
CAUTION:
Do not reuse the starter interlock switch if it is removed from the vehicle
even once. Replace with a new starter interlock switch when installing.
1. Disconnect the negative battery cable..
2. Disconnect the starter interlock switch connector.
3. Verify that the contin ...
