Mazda CX-5 Service & Repair Manual: Oil Cooler Removal/Installation [Fw6 A EL, Fw6 Ax EL]
1. Disconnect the negative battery cable..
2. Remove the front under cover No.2..
3. Drain the ATF..
4. Drain the engine coolant..
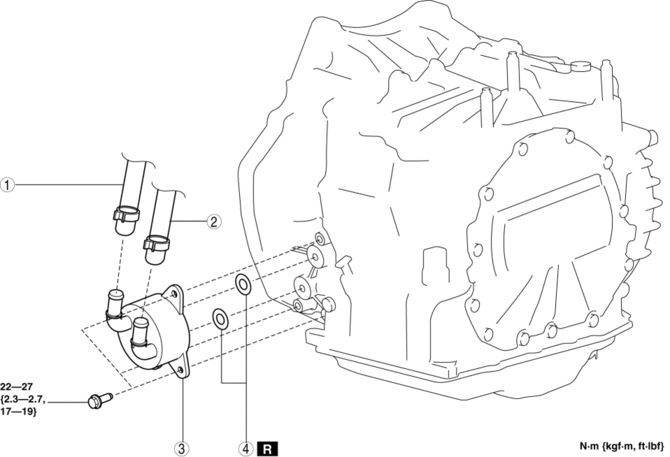
5. Remove in the order indicated in the table.
|
1 |
Water hose (connected to the water pipe) |
|
2 |
Water hose (connected to the outlet) |
|
3 |
Water-cooled oil cooler |
|
4 |
O-rings |
6. Install in the reverse order of removal.
7. Add the engine coolant..
8. Add the ATF..
9. Perform the “Mechanical System Test”..
Water Hose Installation Note
1. Install the water hose to the oil cooler as shown in the figure with the hose clamp expanded.
NOTE:
-
A new water hose and hose clamp are attached.

2. Install the hose clamp to the position shown in the figure.
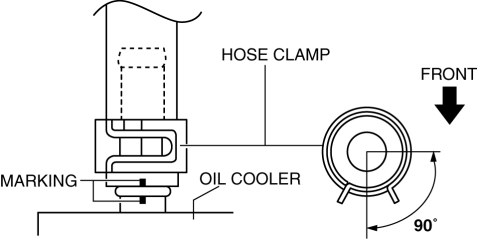
-
Verify that the installation angle of the hose clamp is within the range shown in the figure.
3. Verify that the hose clamp does not interfere with any other components.
 Oil Control Valve (OCV)
Purpose, Function
The OCV switches the oil passage to the hydraulic variable valve timing actuator
to control the opening/closing period of the exhaust valve.
Construction
The O ...
 Oil Cooler Removal/Installation
WARNING:
Hot engines and engine oil can cause severe burns. Turn off the engine and
wait until it and the engine oil have cooled.
A vehicle that is lifted but not securely supported ...
Other materials:
Shift Lever [C66 M R]
Purpose, Function
The shift lever operates the MTX via the control cable.
Construction
Shift lever
The shift lever is designed to prevent improper shifting to 1st gear and
reverse.
Operation
1 GR shifting
A guide plate, attached to the shift lever assembly, ...
Rear Body Control Module (Rbcm) Configuration (Using Read/Write Function)
NOTE:
When performing configuration, it is necessary to read the vehicle specification
information from the rear body control module (RBCM) before replacing it. Connect
the M-MDS to the vehicle and perform vehicle identification before removing
the rear body control module (RBCM). T ...
Climate Control Unit [Manual Air Conditioner]
Purpose
The climate control unit performs air conditioning according to the operation
by the users and the driving conditions of the vehicle.
Function
The climate control unit determines optimum air-conditioning based on the
input signals from each sensor and the control mo ...
