Mazda CX-5 Service & Repair Manual: Center Accessory Socket Inspection
1. Remove the center accessory socket..
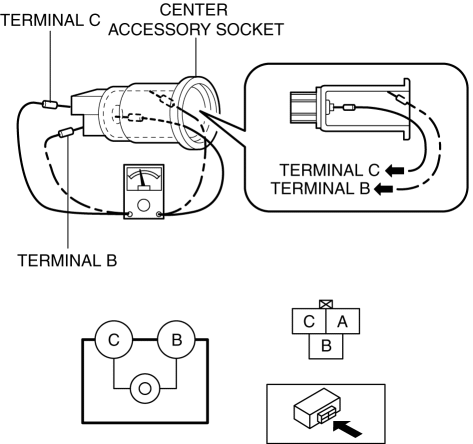
2. Connect the tester probe to the position shown in the figure and verify that there is continuity.
-
If it cannot be verified, replace the center accessory socket..
 Accessory Socket
Purpose
By inserting the plug of an electrical device, 12 V (maximum 120 W) of power
is supplied enabling use of the electrical device in the vehicle.
Function
Front accessory socket
...
 Center Accessory Socket Removal/Installation
1. Disconnect the negative battery cable..
2. Remove the upper console..
3. Insert a tape-wrapped flathead screwdriver into the gap between the cap tab
and socket.
4. Move the flathead scr ...
Other materials:
Tire Maintenance
Improper or inadequate vehicle maintenance can cause tires to wear abnormally.
Here are some important maintenance points:
Tire Inflation Pressure
Inspect all tire pressure monthly (including the spare) when the tires are cold.
Maintain recommended pressures for the best ride, top handling, an ...
Bsm Indicator Light Does Not Flash While Under Bsm Indicator Light Flashing
Conditions (With Combination Switch Operation (Turn Signal Switch)) [Blind Spot
Monitoring (Bsm)]
Description
BSM indicator light does not flash while under BSM indicator light-flashing
conditions (with combination switch operation (turn signal switch))
The BSM indicator light does not flash or illuminate continuously,
but the cond ...
Oil Seal (Control Valve Body) Replacement [Fw6 A EL, Fw6 Ax EL]
1. Disconnect the negative battery cable..
2. Remove the air cleaner component..
3. Disconnect the control valve body connector.
CAUTION:
Make sure that your hand does not touch the terminal as the connector terminal
could be damaged.
Water or foreign objects entering th ...
