Mazda CX-5 Service & Repair Manual: Bumper Slider Removal/Installation
Front Bumper Slider
1. Disconnect the negative battery cable..
2. Remove the seal board upper..
3. Remove the front bumper..
4. Remove bolts A.
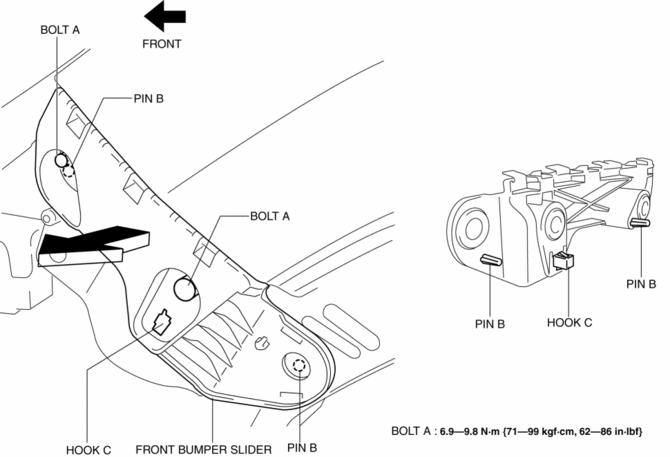
5. Pull the front bumper slider in the direction of the arrow while detaching pins B and hook C.
6. Install in the reverse order of removal.
Rear Bumper Slider
1. Disconnect the negative battery cable..
2. Remove the following parts:
a. Rear combination light.
b. Rear splash shield.
c. Rear bumper.
3. Remove screw A.
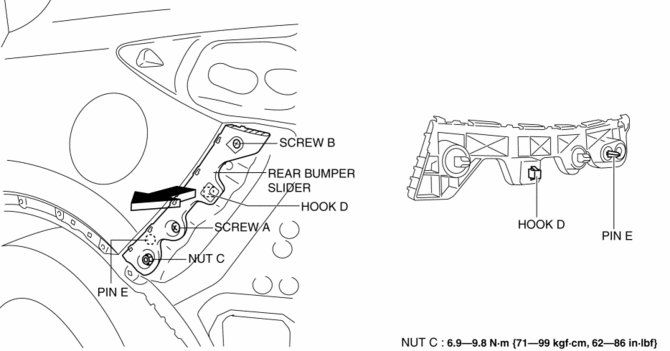
4. Remove screw B.
5. Remove nut C.
6. Pull the rear bumper slider in the direction of the arrow while detaching hook D and pin E.
7. Install in the reverse order of removal.
 Bumper Bracket Removal [Panel Replacement]
Symbol Mark
Removal Procedure
1. Rough cut area locations indicated by (A).
2. Grind the 6 locations indicated by (B) shown in the figure.
CAUTION:
When grinding 6 locations indi ...
 Bumper Stiffener Lower Removal/Installation
1. Disconnect the negative battery cable..
2. Remove the following parts:
a. Seal board upper.
b. Front bumper.
c. Seal plate.
d. Front under cover No.1.
3. Remove bolts A.
4. Pull t ...
Other materials:
Antenna Feeder No.1 Inspection
With audio system
1. Disconnect the negative battery cable..
2. Remove the following parts:
a. A-pillar trim (RH).
b. Decoration panel.
c. Audio unit.
3. Disconnect antenna feeder No.2.
4. Verify that the continuity between antenna feeder No.1 terminals is as indicated
in the tabl ...
Panel Light Control Indicator Alarm
Purpose
The panel light control indicator alarm notifies the driver that the panel
light brightness is either at maximum or minimum.
Function
If the panel light control switch is in the maximum rotation position right
or left when the TNS switch ON signal (TNS and headlight ...
Steering Switch Removal/Installation
WARNING:
Handling the driver-side air bag module improperly can accidentally operate
(deploy) the air bag module, which may seriously injure you. Read the service
warnings and cautions before handling the air bag module..
1. Switch the ignition OFF (LOCK).
2. Disconnect the neg ...
