
Mazda CX-5 Service & Repair Manual: Blower Motor [Manual Air Conditioner]
Purpose
-
The blower motor sends airflow into the cabin.
Function
-
The blower motor rotates the blower fan to create airflow and sends out the airflow in the blower unit and A/C unit.
Construction
-
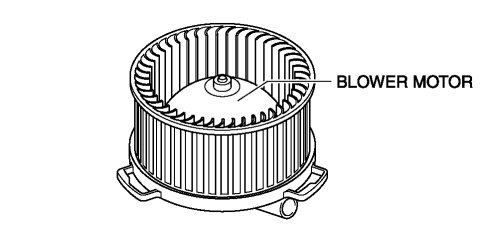
The blower motor is installed to the blower unit.
-
The blower motor consists of the blower fan and motor.
-
A sirocco fan has been adopted for the blower fan.
Operation
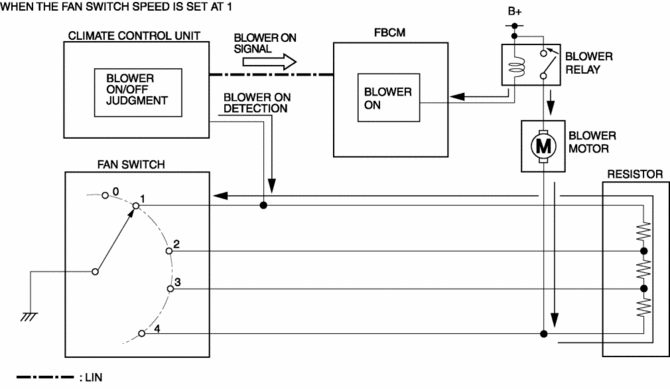
1. The front body control module (FBCM) turns on the blower relay based on the blower ON signal sent from the climate control unit.
2. When the blower relay turns on, the blower motor fan rotates.
3. The rotation speed of the blower fan is determined by the resistance in the resistor. If the resistance is low, the rotation speed increases, if the resistance is high, the speed decreases.
Fail-safe
-
Function not equipped.
 Blower Motor [Full Auto Air Conditioner]
Purpose
The blower motor sends airflow into the cabin.
Function
The blower motor rotates the blower fan to create airflow and sends out the
airflow in the blower unit and A/C un ...
 Climate Control Unit Disassembly/Assembly [Manual Air Conditioner]
1. Disassemble in the order indicated in the figure.
1
Dial
2
Airflow mode wire
(See Wire Removal Note.)
(See Wire Installation Note.)
...
Other materials:
Power Brake Unit Inspection
NOTE:
The following inspection methods are simple inspection methods to judge the
function of the power brake unit.
If there is any malfunction in the power brake unit, replace the power brake
unit as a single unit.
Without Using SST
Operation inspection
1. With the eng ...
Engine Coolant Temperature (ECT) Sensor Removal/Installation
WARNING:
When the engine is hot, it can badly burn. Turn off the engine and wait until
it is cool before removing the ECT sensor.
ECT Sensor No.1
1. Disconnect the negative battery cable..
2. Remove the plug hole plate..
3. Drain the engine coolant..
4. Pull out the evaporati ...
Pressure Sensor Removal/Installation [Two Step Deployment Control System]
WARNING:
Handling the pressure sensor improperly can accidentally operate (deploy)
the air bag module, which may seriously injure you. Read the air bag system
service warnings and cautions before handling the pressure sensor..
1. Switch the ignition to off.
2. Disconnect the ne ...
