Mazda CX-5 Service & Repair Manual: Blower Motor [Full Auto Air Conditioner]
Purpose
-
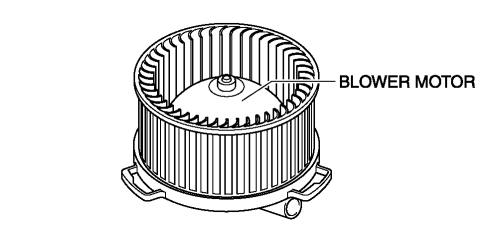
The blower motor sends airflow into the cabin.
Function
-
The blower motor rotates the blower fan to create airflow and sends out the airflow in the blower unit and A/C unit.
Construction
-
The blower motor is installed to the blower unit.
-
The blower motor consists of the blower fan and motor.
-
A sirocco fan has been adopted for the blower fan.
Operation
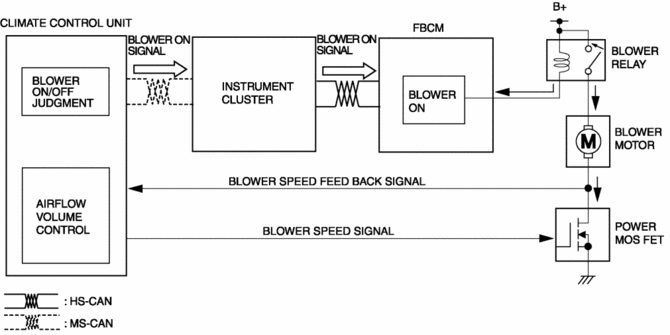
1. The front body control module (FBCM) turns on the blower relay based on the blower ON signal sent from the climate control unit.
2. When the blower relay turns on, the blower motor fan rotates.
3. The rotation speed of the blower fan is determined by the transistor in the power MOS FET. If the current value flowing through the transistor is high, the rotation speed increases, if the current value is low, the speed decreases.
Fail-safe
-
Function not equipped.
 Blower Motor Removal/Installation [Manual Air Conditioner]
1. Disconnect the negative battery cable..
2. Remove the dashboard under cover..
3. Disconnect the connector.
4. Remove the screws.
5. Remove the blower motor.
6. Install in the reve ...
 Blower Motor [Manual Air Conditioner]
Purpose
The blower motor sends airflow into the cabin.
Function
The blower motor rotates the blower fan to create airflow and sends out the
airflow in the blower unit and A/C un ...
Other materials:
Instrument Cluster
Outline
The instrument cluster centrally controls the speedometer, tachometer, odometer/tachometer,
fuel gauge, warning/indicator lights, trip computer, warning sounds and panel
lights.
Function
The instrument cluster displays the following information to notify the user
...
M Position Switch Inspection [Fw6 A EL, Fw6 Ax EL]
Continuity Inspection
NOTE:
The M position switch is built into the selector lever component.
1. Disconnect the negative battery cable..
2. Remove the front console..
3. Disconnect the selector lever component connector.
4. Verify that the continuity between selector lever c ...
Differential Oil Temperature Sensor Removal/Installation
WARNING:
Hot differential oil may cause severe burns. Do not perform maintenance while
differential oil is hot.
1. Disconnect the negative battery cable.
2. Disconnect the differential oil temperature sensor connector.
3. Remove the differential oil temperature sensor.
4. ...
