Mazda CX-5 Service & Repair Manual: Power Brake Unit Removal/Installation
CAUTION:
-
Once the brake switch clearance has automatically been adjusted, it cannot be adjusted again. Therefore, replace the switch with a new one when replacing the power brake unit or performing any procedure that changes the pedal stroke.
1. Remove the battery and battery tray..
2. Remove the windshield wiper arm and blade..
3. Remove the cowl grille..
4. Remove the windshield wiper motor and link..
5. Remove the cowl panel..
6. Remove the master cylinder..
7. Remove in the order indicated in the table.
8. Install in the reverse order of removal.
9. After installation, add brake fluid, bleed the air, and inspect for fluid leakage..
10. Remove the brake switch..
11. Inspect the brake pedal..
12. Install a new brake switch..
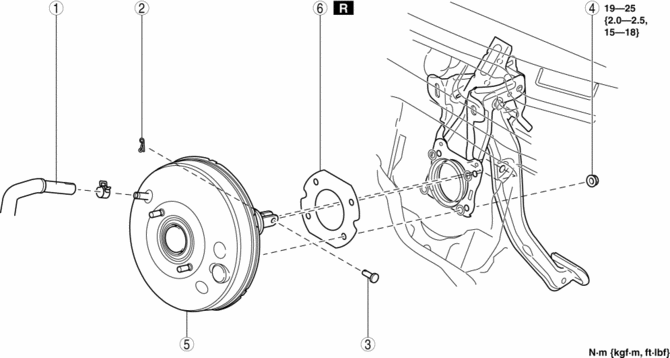
|
1 |
Vacuum hose |
|
2 |
Snap pin |
|
3 |
Clevis pin |
|
4 |
Nut |
|
5 |
Power brake unit |
|
6 |
Gasket |
 Power Brake Unit Inspection
NOTE:
The following inspection methods are simple inspection methods to judge the
function of the power brake unit.
If there is any malfunction in the power brake unit, replace the ...
 R 3 5 Brake [Fw6 A EL, Fw6 Ax EL]
Purpose/Function
The R-3-5 brake operates in 3GR, 5GR and in reverse to lock the reduction
internal gear against rotation.
Construction
The R-3-5 brake consists of the following ...
Other materials:
Refrigerant Pressure Sensor Inspection [Full Auto Air Conditioner]
1. Install the manifold gauge.
2. Verify the high-pressure side reading of the manifold gauge.
3. Measure the terminal voltage at PCM terminal 2BB, 2AX and 2AJ
4. Using the graph below, measure and verify the terminal voltages at 2AX.
5. Follow the PCM inspection when measuring the other te ...
Non Return Valve
Purpose, Function
Assures safety by preventing fuel from returning to the fuel filler opening.
Construction
The non-return valve cannot be removed as it is installed inside the fuel
tank.
2WD
AWD
A single valve type has been adopted for the non-return v ...
Front Door Latch And Lock Actuator Removal/Installation
1. Perform the front door glass preparation..
2. Disconnect the negative battery cable..
3. Remove the following parts:
a. Inner garnish.
b. Front door trim.
c. Inner handle.
d. Front door glass.
e. Front door module panel.
f. Front door key cylinder.
4. Remove the door lock knob c ...
