Mazda CX-5 Service & Repair Manual: Repairable Range Of Polypropylene Bumpers [Plastic Body Parts]
The three types of damaged bumpers shown below are considered repairable. Although a bumper which has been damaged greater than this could also be repaired, it should be replaced with a new one because such repair would detract from the looks and quality of the bumper. In addition, such repair is not considered reasonable in terms of work time.
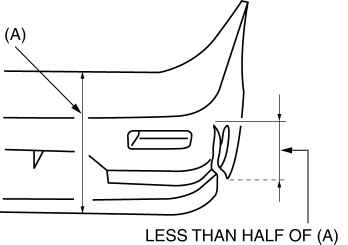
Repairable Bumpers
1. A bumper with a hole less than 50 mm {1.97 in} in diameter.

2. A bumper with a crack less than 100 mm {3.94 in} in length.
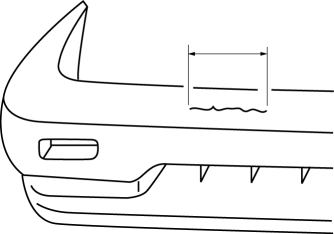
3. A bumper with a crack less than 100 mm {3.94 in} in length that is less than half of the width of the bumper.
 Rear Scuff Plate Removal/Installation
1. Take the shaded area shown in the figure, detach tab A while pulling the rear
scuff plate in the direction of the arrow (1) shown in the figure, then detach hook
B, clips C, pins D while pullin ...
 Shift Panel Removal/Installation
ATX
1. Disconnect the negative battery cable..
2. Selector lever to neutral position.
3. Remove the front console box..
4. Take the shaded area shown in the figure, and remove the shift panel i ...
Other materials:
Fuel Gauge Sender Unit Inspection [Awd]
Fuel gauge sender unit (main)
NOTE:
For the fuel gauge sender unit removal/installation, refer to the fuel pump
removal/installation because the fuel gauge sender unit is integrated with the
fuel pump..
1. Verify that the resistance at fuel gauge sender unit (main) terminals D a ...
Turbine/Input Shaft Speed Sensor, Output Shaft Speed Sensor [Fw6 A EL, Fw6 Ax
EL]
Purpose/Function
The turbine/input shaft speed sensor detects the rotation speed of the input
shaft (low clutch drum).
The output shaft speed sensor detects the rotation speed of the output shaft
(primary gear).
The turbine/input shaft speed sensor and output shaft speed ...
Main Fuse
Purpose
If electric current of the specified value or more flows to each fuse, the
fuse melts due to heat generation to protect the systems and parts downstream
of the fuse.
Function
If electric current to each fuse is the specified value or more, the fuse
melts due to h ...
