Mazda CX-5 Service & Repair Manual: Automatic Transaxle Fluid (ATF) Inspection [Fw6 A EL, Fw6 Ax EL]
CAUTION:
-
If the ATF level is not within the specification or ATF is not adhering to the dipstick after warming up the engine, do not drive the vehicle. Otherwise, the transaxle could be damaged.
ATF level inspection
1. Remove the dipstick securing bolt.
2. Connect the M-MDS to the DLC-2 and display the PID TFT.
3. Warm up the engine until the ATF temperature is 50 °C {122 °F}
.
4. Remove the dipstick and wipe ATF off using a nylon cloth while leaving the engine idling.
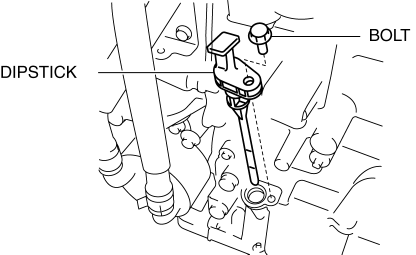
5. Insert the dipstick and pull it out again.
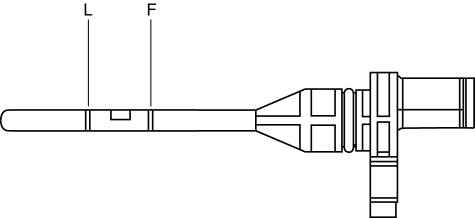
6. Verify that the ATF is adhering between L and F on the dipstick.
-
If ATF is not adhering between L and F on the dipstick, adjust the ATF level..
NOTE:
-
The ATF color is blue.
-
Only use ATF FZ for the FW6A-EL, FW6AX-EL.
-
ATF type
-
ATF FZ
7. Insert the dipstick and install the securing bolt.
-
Tightening torque
-
8—11 N·m {82—112 kgf·cm, 71—97 in·lbf}
 Automatic Transaxle Fluid (ATF) Adjustment [Fw6 A EL, Fw6 Ax EL]
CAUTION:
Only adjust the ATF level when the ATF temperature is 45—55 °C {113—131 °F}.
If the ATF level is incorrect, it could damage the transaxle.
Do not add ATF over the spe ...
 Automatic Transaxle Fluid (ATF) Replacement [Fw6 A EL, Fw6 Ax EL]
WARNING:
Do not perform the servicing while the ATF is hot. Otherwise, it could cause
severe burns or serious injury.
1. Remove the front under cover No.2..
2. Remove the dipstick s ...
Other materials:
Check Valve
Except U.S.A. And CANADA
Purpose, function
The check valve maintain the pressure in the fuel tank at constant pressure.
Construction
The check valve is installed to the side of the charcoal canister.
Mainly consists of valve, umbrella, and spring.
O ...
Passenger Compartment Temperature Sensor [Full Auto Air Conditioner]
Purpose
The passenger compartment temperature sensor detects the cabin temperature.
Function
The passenger compartment temperature sensor converts the detected temperature
to an electric signal.
Construction
A thermistor-type passenger compartment temperature sens ...
Rear Suspension
Outline
E-type multi-link rear suspension has been adopted.
The longitudinal span of the rear crossmember was extended and the longitudinal
offset of the rear lateral link attachment position was reduced.
Welding flanges were removed from the rear cros ...
