Mazda CX-5 Service & Repair Manual: Recliner Motor Inspection
WARNING:
-
Handling a side air bag improperly can accidentally operate (deploy) the air bag, which may seriously injure you. Read the service warnings/cautions in the Workshop Manual before handling the front seat (side air bag integrated)..
1. Disconnect the negative battery cable and wait for 1 min
..
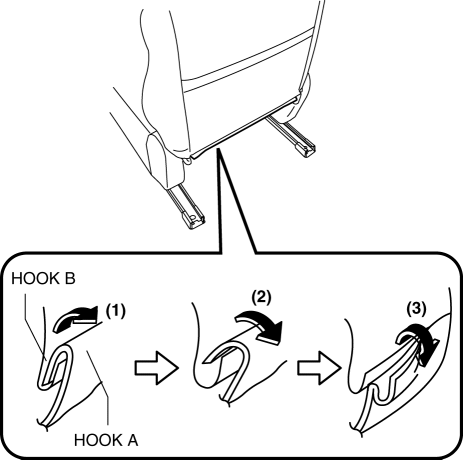
2. Slide hook A in the order of arrows (1), (2), (3) shown in the figure and disconnect them from hook B.
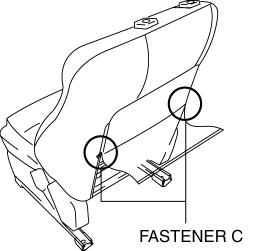
3. Open fasteners C.
4. Disconnect the recliner motor connector.
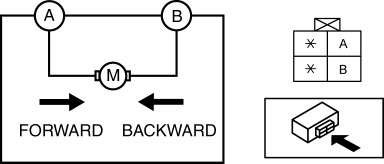
5. Apply battery positive voltage to the front seat back terminals and inspect the recliner motor operation.
-
If not as specified, replace the front seat back frame..
|
Front seat back operation |
Connection |
|
|
A |
B |
|
|
Forward |
B+ |
GND |
|
Backward |
GND |
B+ |
 Rear Seat Removal/Installation
CAUTION:
When removing or putting in the rear seat, contact with the surrounding areas
of the vehicle could cause scratches and damage. When removing or putting in
the rear seat, always ...
 Remote Handle Lever Removal/Installation
1. Disconnect the negative battery cable..
2. Remove the following parts:
a. Trunk board.
b. Trunk end trim.
c. Rear scuff plate.
d. Trunk side trim.
3. Disconnect the remote cable on the ...
Other materials:
Power Supply Switching
Outline
By pressing the push button start, switching of the power supply is performed.
Function
The start stop unit switches the power supply according to the vehicle conditions
such as the selector lever (ATX)/shift lever (MTX) position and the pedal depression/release
whe ...
Fully Automatic Type
Climate control information is displayed on the display.
Control Switches
AUTO switch
By pressing the AUTO switch the following functions will be automatically controlled
in accordance with the selected set temperature:
• Airflow temperature
• Amount of airflow
• Selection of airflow ...
Cylinder Block
Purpose, Function
The cylinder block forms the cylinder and crankcase.
Construction
The cylinder block consists of the upper cylinder block and lower cylinder
block.
The cylinder block is an open deck type with excellent cooling performance.
The lightweight cyl ...
