Mazda CX-5 Service & Repair Manual: Automatic Transaxle Fluid (ATF) Replacement [Fw6 A EL, Fw6 Ax EL]
WARNING:
-
Do not perform the servicing while the ATF is hot. Otherwise, it could cause severe burns or serious injury.
1. Remove the front under cover No.2..
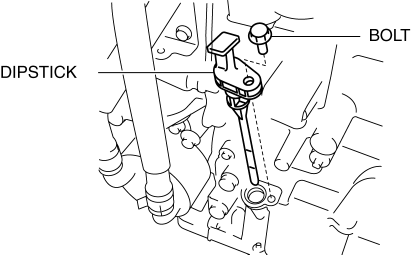
2. Remove the dipstick securing bolt.
3. Remove the dipstick.
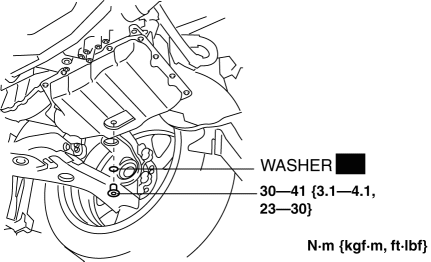
4. Remove the drain plug and washer, and drain the ATF.
5. Install a new washer and drain plug.
-
Tightening torque
-
30—41 N·m {3.1—4.1 kgf·m, 23—30 ft·lbf}
6. Add ATF from the dipstick installation hole.
NOTE:
-
The ATF color is blue.
-
Only use ATF FZ for the FW6A-EL, FW6AX-EL.
-
ATF type
-
ATF FZ
-
Resupply amount (Reference)
-
ATF is drained from drain plug: 3.5—4.9 L {3.7—5.1 US qt, 3.1—4.3 Imp qt}
7. Adjust the ATF level..
8. Insert the dipstick and install the securing bolt.
-
Tightening torque
-
8—11 N·m {82—112 kgf·cm, 71—97 in·lbf}
9. Install the front under cover No.2..
 Automatic Transaxle Fluid (ATF) Inspection [Fw6 A EL, Fw6 Ax EL]
CAUTION:
If the ATF level is not within the specification or ATF is not adhering to
the dipstick after warming up the engine, do not drive the vehicle. Otherwise,
the transaxle could be ...
 Automatic Transaxle Outline [Fw6 A EL, Fw6 Ax EL]
Outline
Contribution to low fuel economy
Wide TCC range
Clutch/brake resistance reduction
Realized direct feel and quick shif ...
Other materials:
Filament Repair
1. Clean the filament using isopropyl alcohol.
2. Attach tape to both sides of the filament.
3. Using a small brush or marking pen, apply silver paint.
4. After 2—3 min, carefully remove the tape without damaging the applied
area.
CAUTION:
Do not operate the rear window defro ...
Accessory Socket
Purpose
By inserting the plug of an electrical device, 12 V (maximum 120 W) of power
is supplied enabling use of the electrical device in the vehicle.
Function
Front accessory socket
When the ignition is switched to ACC or ON (engine off or on), 12 V (maximum
120 W) of pow ...
Windshield Wiper Motor And Link Removal/Installation
1. Disconnect the negative battery cable..
2. Remove the following parts:
a. Windshield wiper arm and blade.
b. Cowl grille.
CAUTION:
Always affix protective tape to the windshield end. If the windshield wiper
motor and link contacts the windshield, it could damage the windshield. ...
