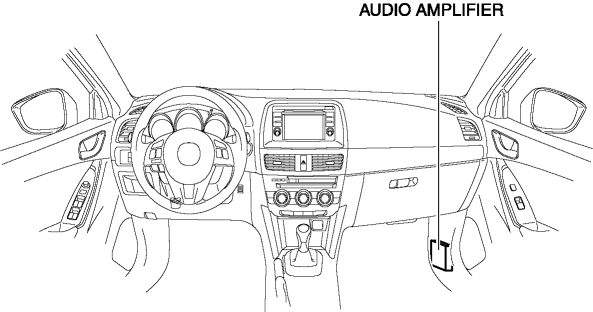
Mazda CX-5 Service & Repair Manual: Audio Amplifier
Purpose, Function
-
The audio signal (analog voltage waveform) output from the unit equipped on the vehicle is converted into a digital pulse. The converted digital pulse signal is amplified and sent to the speakers.
Construction
-
The audio amplifier is placed in the front side trim (RH).
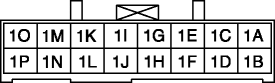
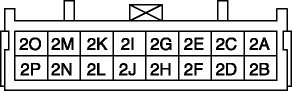
Terminal layout and signal
|
Terminal |
Signal |
|
|
|
1A |
— |
|
1B |
— |
|
|
1C |
— |
|
|
1D |
— |
|
|
1E |
Front door speaker input LH (-) |
|
|
1F |
Front door speaker input LH (+) |
|
|
1G |
Front door speaker input RH (-) |
|
|
1H |
Front door speaker input RH (+) |
|
|
1I |
Rear door speaker input LH (-) |
|
|
1J |
Rear door speaker input LH (+) |
|
|
1K |
Rear door speaker input RH (-) |
|
|
1L |
Rear door speaker input RH (+) |
|
|
1M |
— |
|
|
1N |
— |
|
|
1O |
AudioPilot® 2 microphone (+) |
|
|
1P |
AudioPilot® 2 microphone (-) |
|
|
|
2A |
D-pillar speaker output (+) |
|
2B |
D-pillar speaker output (-) |
|
|
2C |
Tweeter output RH (+) |
|
|
2D |
Body select |
|
|
2E |
Tweeter output RH(-) |
|
|
2F |
AMP control (SW B+) |
|
|
2G |
Tweeter output LH (-) |
|
|
2H |
Vehicle speed signal |
|
|
2I |
Tweeter output LH (+) |
|
|
2J |
AudioPilot® 2 |
|
|
2K |
Rear door speaker output RH (-) |
|
|
2L |
— |
|
|
2M |
Rear door speaker output RH (+) |
|
|
2N |
— |
|
|
2O |
Rear door speaker output LH (+) |
|
|
2P |
Rear door speaker output LH (-) |
|
|
|
3A |
+B |
|
3B |
Ground |
|
|
3C |
Front door speaker output RH (+) |
|
|
3D |
Front door speaker output RH (-) |
|
|
3E |
Front door speaker output LH (-) |
|
|
3F |
Front door speaker output LH (+) |
|
|
3G |
Front center speaker output (+) |
|
|
3H |
Front center speaker output (-) |
|

Operation
-
For the audio amplifier operation, refer to the AUDIO SYSTEM.
Fail-safe
-
Function not equipped.
 Antenna Feeder No.3 Removal/Installation
1. Disconnect the negative battery cable..
2. Remove the following parts:
a. B-pillar lower trim.
b. Front seat belt adjusting cover.
c. Front seat belt upper anchor installation bolt.
d. B- ...
 Audio Amplifier Removal/Installation
1. Disconnect the negative battery cable..
2. Remove the following parts:
a. Front scuff plate (RH).
b. Front side trim (RH).
3. Remove the bolts.
4. Lift up the audio amplifier in the d ...
Other materials:
Fuel Gauge Sender Unit Removal/Installation [2 Wd]
WARNING:
Always keep sparks and flames away from fuel when servicing the fuel system.
Fuel can be easily ignited which could cause serious injury or death, and damage
to equipment.
Fuel line spills and leakage from the pressurized fuel system are dangerous.
Fuel can ignite a ...
Condenser Removal/Installation
1. Disconnect the negative battery cable..
2. Discharge the refrigerant..
3. Remove the front under cover No.1..
4. Drain the engine coolant..
5. Remove the following parts:
a. Plug hole plate.
b. Air cleaner, air hose and fresh air duct component.
c. Coolant reserve tank.
d. Cooling ...
Antenna Feeder No.1 Inspection
With audio system
1. Disconnect the negative battery cable..
2. Remove the following parts:
a. A-pillar trim (RH).
b. Decoration panel.
c. Audio unit.
3. Disconnect antenna feeder No.2.
4. Verify that the continuity between antenna feeder No.1 terminals is as indicated
in the tabl ...
