Mazda CX-5 Service & Repair Manual: Radiator Removal/Installation
WARNING:
-
Never remove the cooling system cap or loosen the radiator drain plug while the engine is running, or when the engine and radiator are hot. Scalding engine coolant and steam may shoot out and cause serious injury. It may also damage the engine and cooling system.
-
Turn off the engine and wait until it is cool. Even then, be very careful when removing the cap. Wrap a thick cloth around it and slowly turn it counterclockwise to the first stop. Step back while the pressure escapes.
-
When you are sure all the pressure is gone, press down on the cap using the cloth, turn it, and remove it.
1. Disconnect the negative battery cable..
2. Remove the front under cover No.1..
3. Drain the engine coolant..
4. Remove the plug hole plate..
5. Remove the air cleaner, air hose and fresh air duct component..
6. Remove the coolant reserve tank..
7. Remove the cooling fan component..
8. Remove in the order indicated in the table.
9. Install in the reverse order of removal.
10. Refill the engine coolant..
11. Inspect for engine coolant leakage..
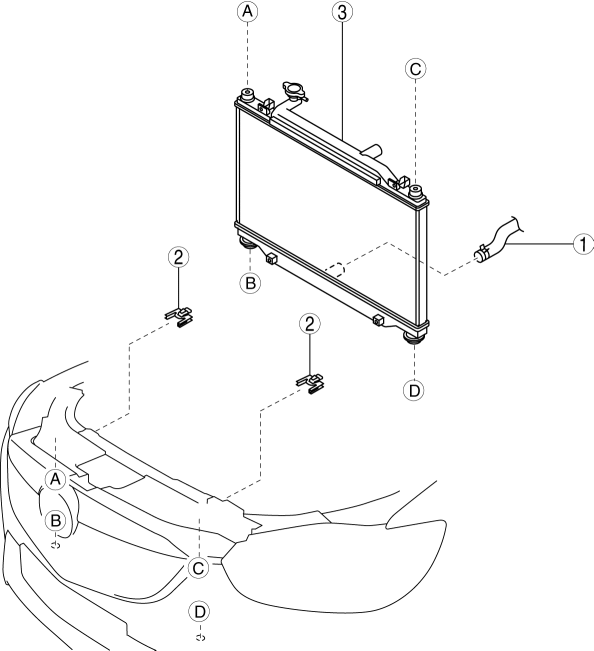
|
1 |
Lower radiator hose |
|
2 |
Upper mount rubber bracket (See Upper Mount Rubber Bracket Removal Note.) |
|
3 |
Radiator (See Radiator Removal Note.) |
Upper Mount Rubber Bracket Removal Note
CAUTION:
-
To prevent damage to the upper mount rubber bracket tab, do not apply excessive force.
1. While pressing down the upper mount rubber bracket tab lightly in the direction of the arrow shown in the figure, pull out the upper mount rubber bracket toward the vehicle rear.
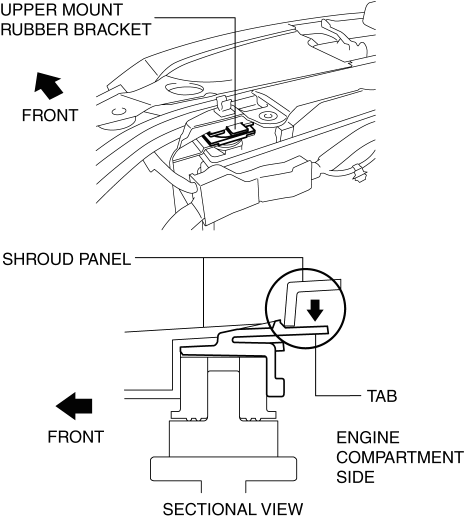
2. Remove the upper mount rubber bracket.
Radiator Removal Note
1. To prevent damage to the radiator core, protect it by covering the radiator surface with cardboard.
2. Lift the radiator and remove it from the radiator installation holes on the shroud panel.
3. Move the radiator and condenser to the engine side.
4. Remove the two bolts (lower side) which secure the condenser to the radiator.
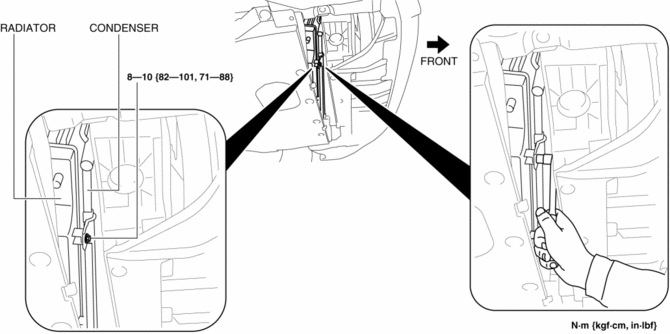
5. Remove the two bolts (upper side) which secure the condenser to the radiator.
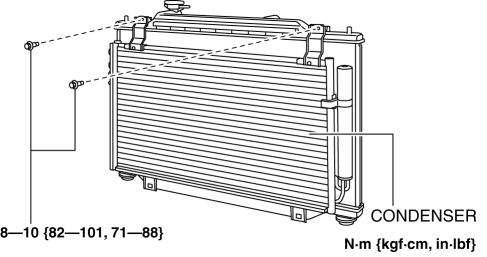
6. Remove the radiator from above the engine compartment.
 Low Engine Coolant Temperature Indicator Light (Blue)/High Engine Coolant Temperature
Warning Light (Red)
Low Engine Coolant Temperature Indicator Light (Blue)/High Engine Coolant Temperature
Warning Light (Red)
Purpose
Low engine coolant temperature indicator light (blue)
The low engine coolant temperature indicator light (blue) notifies the driver
that the engine coolant temperature is low and va ...
 Radiator
Purpose, Function
The radiator disperses the engine coolant heat flowing internally by receiving
against the vehicle while it is driven or air flow produced by the cooling fan.
Constru ...
Other materials:
ABS Wheel Speed Sensor And ABS Sensor Rotor
Purpose/Function
The ABS wheel-speed sensor and ABS sensor rotor detect the rotation condition
of each wheel and transmit this information to the DSC HU/CM.
The signal from the ABS wheel-speed sensor is the primary signal that the
DSC HU/CM uses when carrying out control.
...
Service Cautions
Injury/damage Prevention Precautions
Depending on the vehicle, the cooling fan may operate suddenly even when
the ignition is switched to off. Therefore, keep hands and tools away from the
cooling fan even if the cooling fan is not operating to prevent injury to personnel
or damage t ...
High Pressure Fuel Pump Removal/Installation
WARNING:
Fuel is very flammable liquid. If fuel spills or leaks from the pressurized
fuel system, it will cause serious injury or death and facility breakage. Fuel
can also irritate skin and eyes. To prevent this, always complete the “Fuel
Line Safety Procedure”, while referring ...
