Mazda CX-5 Service & Repair Manual: Air Mix Actuator Removal/Installation [Full Auto Air Conditioner]
Driver-side
1. Disconnect the negative battery cable..
2. Remove the following parts:
a. Side wall (driver-side).
b. Front heat duct (LH).
3. Disconnect the air mix actuator connector.
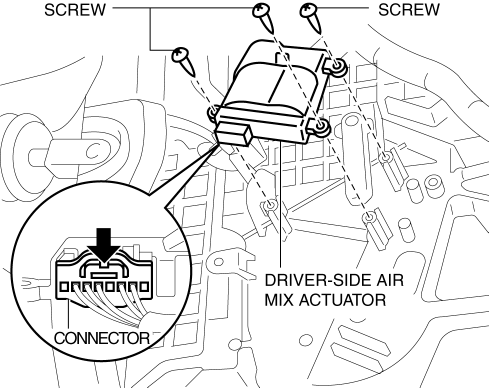
4. Remove the screw.
5. Remove the driver-side air mix actuator.
6. Install in the reverse order of removal.
Passenger-side
1. Disconnect the negative battery cable..
2. Remove the following parts:
a. Dashboard under cover.
b. Glove compartment.
3. Disconnect the air mix actuator connector.
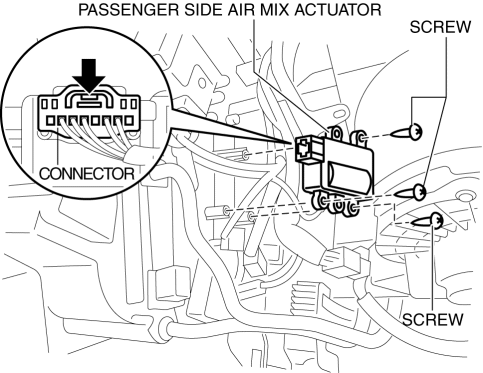
4. Remove the screw.
5. Remove the passenger-side air mix actuator.
6. Install in the reverse order of removal.
 Air Mix Actuator Inspection [Full Auto Air Conditioner]
CAUTION:
If the lever position exceeds the operation range shown in the figure, the
circuit in the actuator could be damaged. Always perform an actuator operation
inspection with the lev ...
 Air Mix Actuator [Full Auto Air Conditioner]
Purpose
The air mix actuator moves the air mix door in the A/C unit to adjust the
temperature of the air blown from the air vent.
Function
Door open/close function
The air mix ...
Other materials:
Air Mix Actuator Inspection [Full Auto Air Conditioner]
CAUTION:
If the lever position exceeds the operation range shown in the figure, the
circuit in the actuator could be damaged. Always perform an actuator operation
inspection with the lever movement within the range shown in the figure.
Driver-side
1. Connect battery positive vol ...
Resistor [Manual Air Conditioner]
Purpose
The resistor controls the blower motor rotation speed.
Function
The resistor controls the supply voltage to the blower motor according to
the fan switch operation, and adjusts the fan rotation speed (airflow volume).
Construction
The resistor is installed ...
Front Door Module Panel Removal/Installation
1. Perform the front door glass preparation..
2. Disconnect the negative battery cable..
3. Remove the following parts:
a. Inner garnish.
b. Front door trim.
c. Front door speaker.
d. Front door glass.
NOTE:
After removing the front door trim, secure the inner handle using scre ...
