Mazda CX-5 Service & Repair Manual: Air Mix Actuator Inspection [Full Auto Air Conditioner]
CAUTION:
-
If the lever position exceeds the operation range shown in the figure, the circuit in the actuator could be damaged. Always perform an actuator operation inspection with the lever movement within the range shown in the figure.
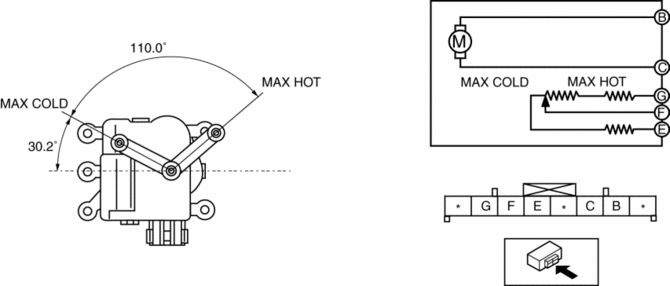
Driver-side
1. Connect battery positive voltage to air mix actuator terminal C (or B), connect terminal B (or C) to ground, and then verify that the air mix actuator operates as shown in the table.
-
If the operation condition is not normal, replace the air mix actuator.
|
Terminal |
Air mix actuator operation |
|
|
B |
C |
|
|
B+ |
Ground |
COLD > HOT |
|
Ground |
B+ |
HOT > COLD |
2. Verify that the resistance between terminals F and G, E and F matches the air mix actuator operation as shown in the graph.
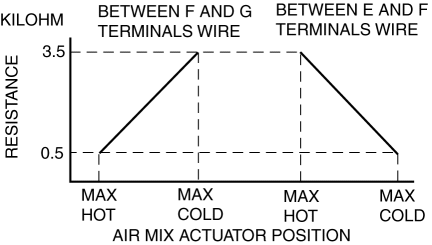
-
If the operation condition and resistance are not normal, replace the air mix actuator.
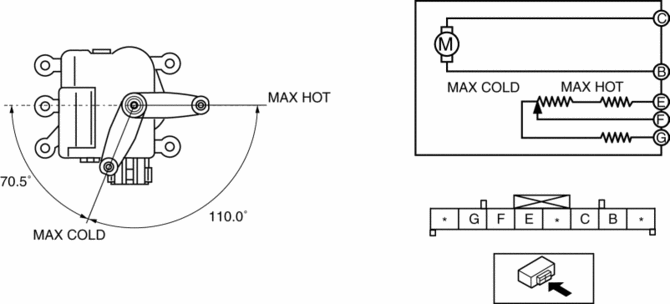
Passenger-side
1. Connect battery positive voltage to air mix actuator terminal C (or B), connect terminal B (or C) to ground, and then verify that the air mix actuator operates as shown in the table.
-
If the operation condition is not normal, replace the air mix actuator.
|
Terminal |
Air mix actuator operation |
|
|
B |
C |
|
|
B+ |
Ground |
HOT > COLD |
|
Ground |
B+ |
COLD > HOT |
2. Verify that the resistance between terminals F and G, E and F matches the air mix actuator operation as shown in the graph.
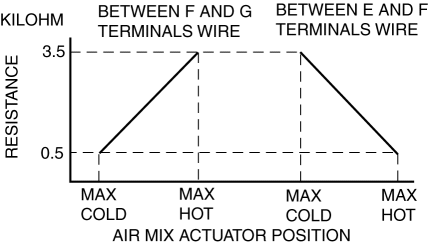
-
If the operation condition and resistance are not normal, replace the air mix actuator.
 Air Intake Control [Full Auto Air Conditioner]
Purpose
The air intake control switches the air intake port (FRESH/REC) according
to the vehicle environment.
Function
The air intake control drives the air intake actuator and ...
 Air Mix Actuator Removal/Installation [Full Auto Air Conditioner]
Driver-side
1. Disconnect the negative battery cable..
2. Remove the following parts:
a. Side wall (driver-side).
b. Front heat duct (LH).
3. Disconnect the air mix actuator connector.
...
Other materials:
Audio Pilot®2 Microphone Removal/Installation
NOTE:
AudioPilot®2 is a registered trademark of Bose® Corporation.
1. Disconnect the negative battery cable..
2. Remove the following parts:
a. Driver-side front scuff plate.
b. Driver-side front side trim.
c. Switch panel.
d. Decoration panel.
e. Shift lever knob (MTX). ...
Starting a Flooded Engine
If the engine fails to start, it may be flooded (excessive fuel in the engine).
Follow this procedure:
1. If the engine does not start within five seconds on the first try, wait ten
seconds and try again.
2. Make sure the parking brake is on.
3. Depress the accelerator all the way and hold it ...
Heater Hose Removal/Installation
With Water Temperature Sensor
1. Remove the battery..
2. Drain the engine coolant..
3. Remove the insulator.
4. Remove the clips and remove the heater hose.
5. Remove the heater hose.
6. Install in the reverse order of the removal.
7. Inspect for engine coolant leaka ...
