Mazda CX-5 Service & Repair Manual: Rear Console Disassembly/Assembly
1. Disassemble in the order indicated in the table.
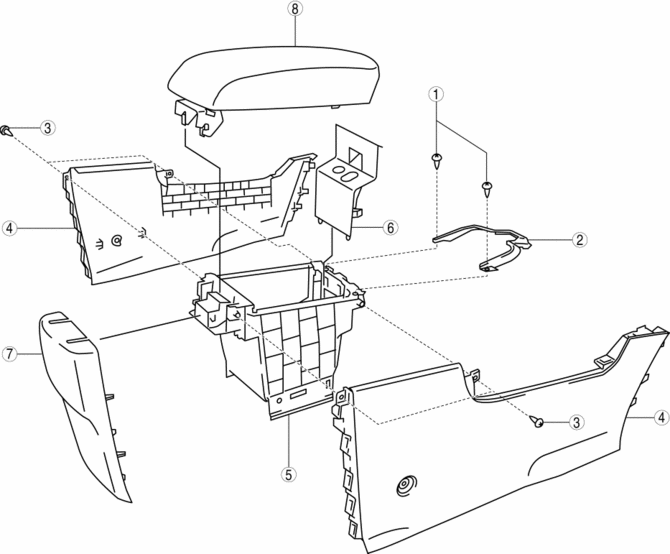
|
1 |
Screw A |
|
2 |
Rear console bracket |
|
3 |
Screw B |
|
4 |
Side panel |
|
5 |
Rear console box |
|
6 |
Upper console |
|
7 |
Rear console cover |
|
8 |
Rear console lid |
2. Assemble in the reverse order of disassembly.
 Knee Bolster Removal/Installation
1. Disconnect the negative battery cable..
2. Remove the following parts:
a. Driver-side front scuff plate.
b. Driver-side front side trim.
c. Switch panel.
d. Decoration panel.
e. Shift l ...
 Rear Console Removal/Installation
1. Disconnect the negative battery cable..
2. Remove the following parts:
a. Front console box.
b. Shift lever knob (MTX).
c. Shift panel.
d. Upper panel.
3. Remove screws A.
4. Remo ...
Other materials:
Operating Tips for Audio System
WARNING
Always adjust the audio while the vehicle is stopped:
Do not adjust the audio control switches while driving the vehicle.
Adjusting the audio while driving the vehicle is dangerous as it could distract
your attention from the vehicle operation which could lead to a serious accident.
Ev ...
Refrigerant Pressure Sensor Removal/Installation [Full Auto Air Conditioner]
1. Disconnect the negative battery cable..
2. Discharge the refrigerant..
3. Disconnect the refrigerant pressure sensor connector.
CAUTION:
If moisture or foreign material enters the refrigeration cycle, cooling ability
will be lowered and abnormal noise will occur. Always immediate ...
Solar Radiation Sensor [Full Auto Air Conditioner]
Purpose
The solar radiation sensor detects the sunlight intensity emitted to the
cabin.
Function
The solar radiation sensor converts the detected solar radiation amount to
an electric signal.
Construction
A photodiode (light receiving diode) has been adopted fo ...
