
Mazda CX-5 Service & Repair Manual: Air Intake Actuator [Full Auto Air Conditioner]
Purpose
-
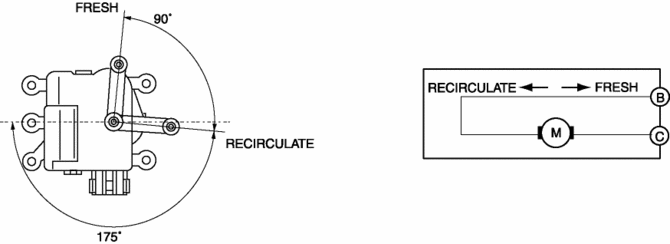
The air intake actuator moves the air intake door in the blower unit to switch the air intake port.
Function
-
The air intake actuator drives the motor based on the signal from the climate control unit and moves the air intake door to the FRESH or REC position.
Construction
-
A mechanical lock type air intake actuator has been adopted.
-
The air intake actuator is installed to the blower unit.
Operation
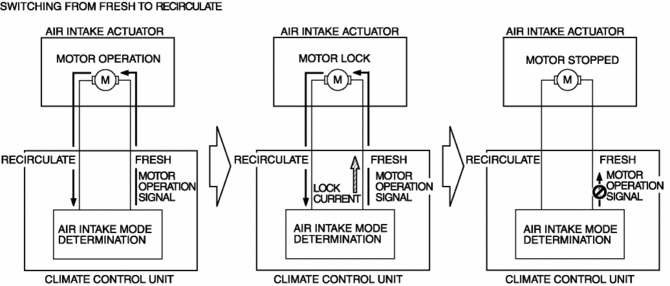
1. The climate control unit outputs a motor drive signal to the air intake actuator based on the air intake mode determined by the air intake control.
2. When the air intake actuator moves to FRESH or REC, the motor locks.
3. When the motor locks and is under excessive load, the current value flowing from the climate control unit increases more than the specification (lock current).
4. When the lock current is detected, the climate control unit stops the motor drive signal to the air intake actuator.
Fail-safe
-
Function not equipped.
 Air Intake Actuator Removal/Installation [Manual Air Conditioner]
1. Disconnect the negative battery cable..
2. Remove the glove compartment..
3. Disconnect the air intake actuator connector.
4. Remove the screw, then remove the air intake actuator.
5. I ...
 Air Intake Actuator [Manual Air Conditioner]
Purpose
The air intake actuator moves the air intake door in the blower unit to switch
the air intake port.
Function
The air intake actuator drives the motor based on the signal ...
Other materials:
Meters and Gauges
1 Speedometer
2 Odometer, Trip Meter and Trip Meter Selector
3 Tachometer
4 Fuel Gauge
5 Dashboard Illumination
6 Outside Temperature Display
7 Trip Computer and INFO Switch
Speedometer
The speedometer indicates the speed of the vehicle.
Odometer, Trip Meter and Trip Meter Selector
...
Camshaft Position (CMP) Sensor Removal/Installation
CAUTION:
When replacing the CMP sensor, make sure there is no foreign material on
it such as metal shavings. If it is installed with foreign material, the sensor
output signal will malfunction resulting from fluctuation in magnetic flux and
cause a deterioration in engine control.
...
Condenser Removal/Installation
1. Disconnect the negative battery cable..
2. Remove the following parts:
a. Trunk board.
b. Trunk end trim (LH).
c. Rear scuff plate (LH).
d. Trunk side trim (LH).
e. D-pillar trim (LH).
3. Disconnect the connector.
4. Remove the bolts.
5. Remove the condenser.
6. Install in ...
