Mazda CX-5 Service & Repair Manual: Shroud Side Member Installation [Panel Replacement]
Symbol Mark

Installation Procedure
1. When installing new parts, measure and adjust the body as necessary to conform with standard dimensions.
2. Drill holes for the plug welding before installing the new parts.
3. After temporarily installing new parts, make sure the related parts fit properly.
4. Plug weld the 8 locations indicated by (A) and 2 locations indicated by (B) shown in the figure.
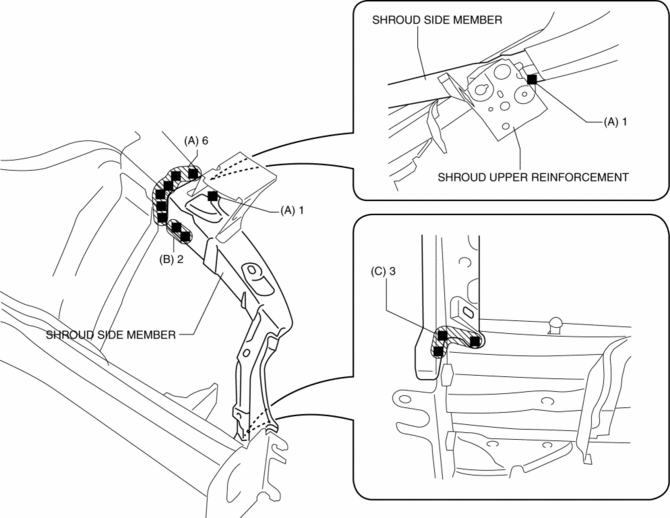
5. Plug weld the 3 locations indicated by (C) shown in the figure, then install the shroud side member.
 Shroud Panel Removal/Installation
CAUTION:
Since the servicing is performed with the hood open, secure the hood using
a piece of wood to prevent it from falling.
1. Disconnect the negative battery cable..
2. Remove ...
 Shroud Side Member Removal [Panel Replacement]
Symbol Mark
Removal Procedure
1. Drill the 3 locations indicated by (A) shown in the figure.
2. Drill the 8 locations indicated by (B) and 2 locations indicated by (C) shown
in the figure.
...
Other materials:
Rear Brake (Disc) Removal/Installation
1. Loosen the adjusting nut..
2. Remove in the order indicated in the table.
3. Install in the reverse order of removal.
4. After installation, add brake fluid, bleed the air, and inspect for fluid
leakage..
5. Pump the brake pedal a few times and inspect the following:
The disc pa ...
Fuel Filler Cap
Purpose, Function
Releases evaporative gas from the fuel tank if there is a malfunction in
the evaporative gas passage between the fuel tank and the intake manifold. As
a result, deformation of the fuel tank caused by evaporative gas pressure is
prevented.
Construction
T ...
Air Bag Module And Pre Tensioner Seat Belt Deployment Procedures [Two Step Deployment
Control System]
WARNING:
A live (undeployed) air bag module, pre-tensioner seat belt or lap pre-tensioner
seat belt may accidentally operate (deploy) when it is disposed of and cause
serious injury. Do not dispose of a live (undeployed) air bag module, pre-tensioner
seat belt or lap pre-tensioner s ...
